feeling fancy

IMG_2682
our version of a a “fancy” filled treat: flour & refined sugar-free cream-puffs filled with delectable agave whipped cream!

I have a completely & totally irrational dislike of all filled-foods.

Cream puffs, éclairs, filled donuts, tortellini, even crab rangoons–you name it, I’m not a fan. 

On the flip side, I married a man who loves long-johns filled with bavarian cream more than just about any other food in the universe. I literally cringe when I watch him take a bite and wait for the inevitable yet unpredictable SQUIRT! of cream that comes popping out of the pastry…bleh!

bavariancreamdonut
I see that hole…and now I’m just waiting for the squuiiirrrrt once Tom takes his first bite

In doing my best to avoid extensive therapy to understand why I dislike filled-foods so much, I have three theories for why I avoid these food items like the plague:

  • I don’t like the unknown-ness: I like feeling in control (very Type A, I know) and I don’t like feeling like I don’t know what I’m about to eat. Sure, the nice bakery counter lady said it was filled with a nice simple raspberry jam, but what if it’s almond-flavored cream?! This is simply a risk not worth taking.
    • It would be remiss if I didn’t note here how much I hate almond flavoring. Yes, I said it: HATE. My grandmother has told me repeatedly that this makes me a terrible Scandinavian, and I understand that this is just something I am going to have to live with. The overly-sweet floral nuttiness of this disgusting flavor makes my stomach churn. Even the smell makes me feel slightly sick–which is rough when you went to a college with a Swedish heritage that used almond-scented dish soap in all their campus buildings. It was torture.
almonddishsoap
I can smell this soap just looking at it ::shudders::
  • I don’t like the texture mix: This seems like slightly less of reason, but it is true that the odd texture differences between what you’re eating (ie: a flaky, yeasty donut) and what it’s filled with (ie: cold, wet, gelatinous goop) is a bit unsettling. My mouth is like “I thought we were eating a donut, what’s with this creamy stuff? Are we supposed to chew this or just swallow?
  • I don’t like the mess: I don’t care if your 5 or 95–eating filling things almost always means some of it is going to end up on your shirt.

Now despite all this uneasiness regarding filled baked goods, Tom and I have been watching a lot of baking shows this winter. All of the “Baking Championships”, The Great British Baking Show, The Great Holiday Baking Show (not nearly as good as the British version, just saying!), Cupcake Wars–the list could go on and on. Basically, if it involves competition and an oven we’ve watched it.

Throughout our many hours of viewing of these competitive food shows, I began to have a fascination with pâte à choux, (pronounced pat-a-shoe for the non-French speakers out there like me), the light pastry dough that you make cream puffs and éclairs out of. While I didn’t like eating these items, I was enamored by this versatile pastry dough that you start on the stove (say what?!), bake in the oven until it blows up like a balloon, and finally turn into fancy-sounding things like profiteroles and croquembouches.

After more thought, I realized that if every competitor on the baking shows Tom and I love makes pâte à choux, I figured I better get on board and figure out how to make them myself for when I eventually fulfill my lifelong dream of competing on Food Network. Although I was still dubious re: eating all filled things, the fact of the matter is that I married a man who is obsessed with them…or at least their cream filling. So, knowing that at least someone would eat whatever I came up with, I got to work.

Being that it’s me, I began a hunt for a more diabetic-friendly pâte à choux recipe.  I hunted high and low and found a lot of odd recipes that claimed to be “healthy” but then still had refined flour and sugar. I finally stumbled on a recipe that used ground oatmeal instead of flour (crazy, right?!) and that’s what I used as a starting point when I started getting crafty in the kitchen. A few (dozen) collapsed cream puffs later, I finally, finally came up with the below–a just-sweet-enough cream puff that’s both flour & refined sugar-free.

But remember, this was a recipe that I was making for Tom to eat–so it couldn’t taste like a sneakily healthier knock-off of his favorite bavarian cream-filled donuts. It had to be rich, it had to be sweet, and it had to be filled.

So…where’s the compromise?

Here’s our answer:

  • Ditch the white flour (and add some whole grains!) by utilizing ground oatmeal for the base
  • Use natural agave syrup instead of refined sugar or a fake sweetener to keep it sweet yet diabetic-friendly
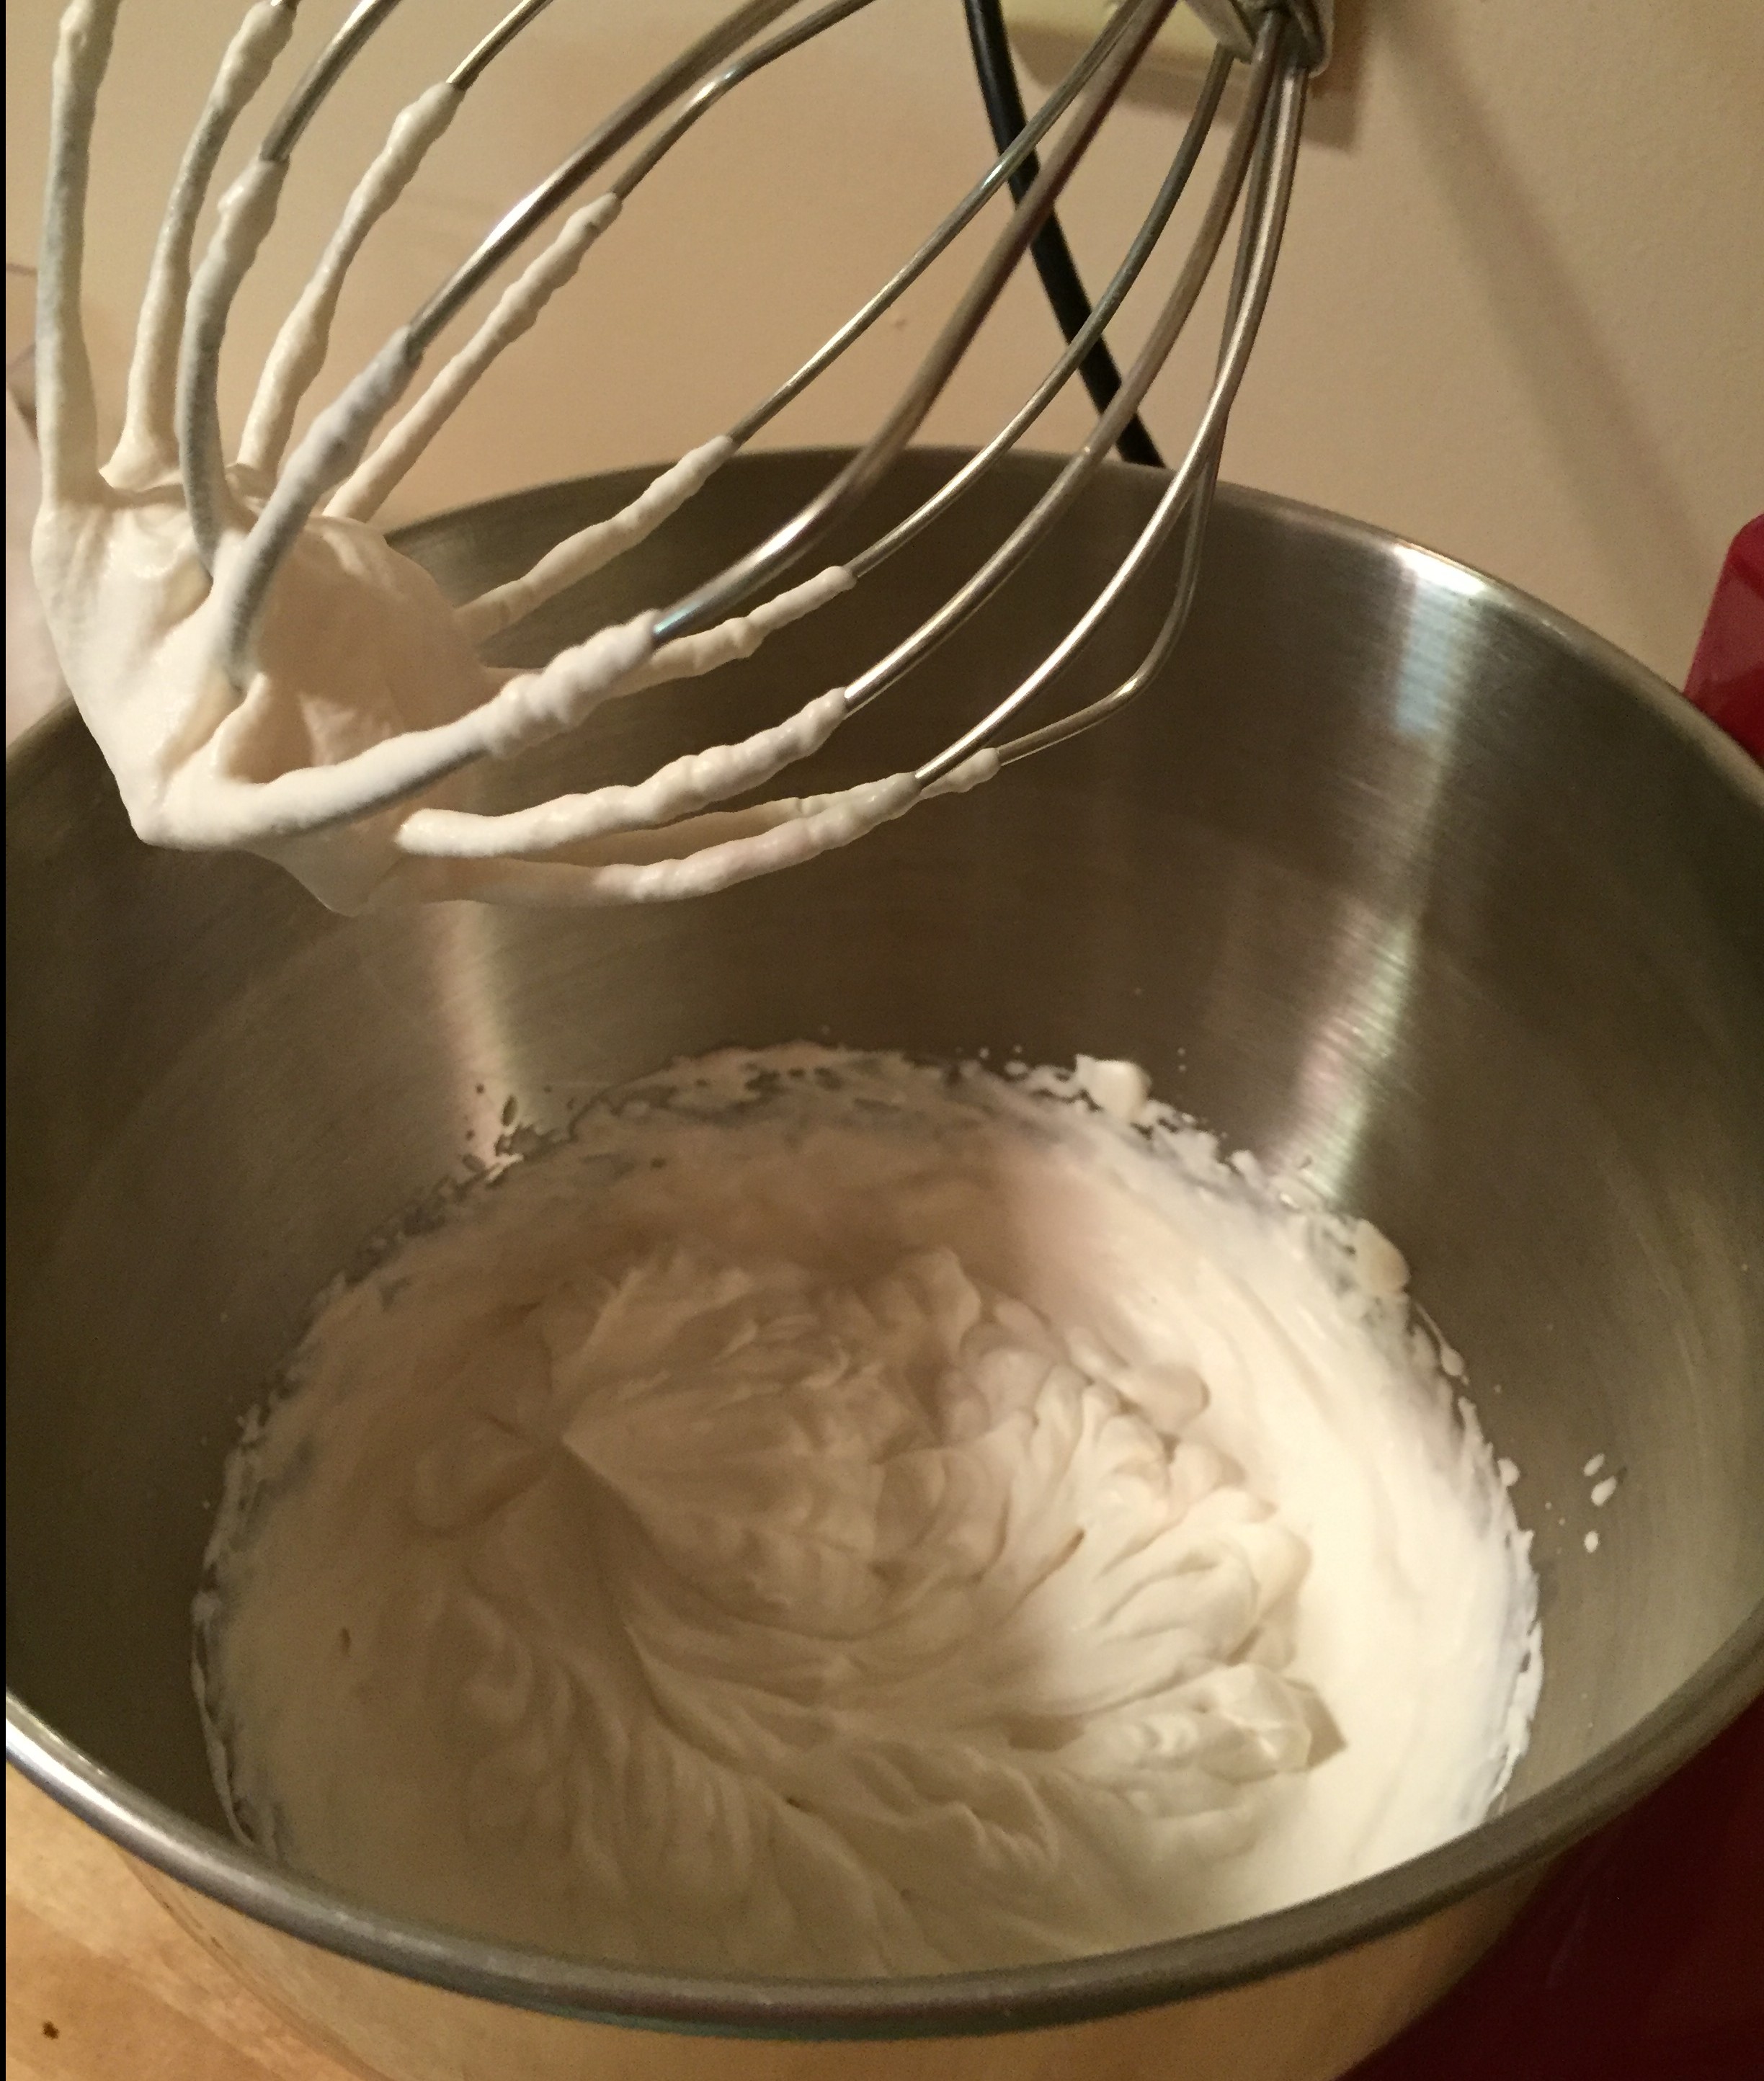
  • Fill it with lots & lots & lots of homemade whipped cream that only has three ingredients: heavy cream, vanilla, & (you guessed it!) agave syrup

| Feeling Fancy Cream Puffs |

Serves: 8 Tom’s or 16 Alaina’s

Ingredients Needed:

  • 1 cup water
  • 6 tbsp. butter, salted
  • 1/2 cup oatmeal, finely ground
    • Use a food processor or coffee grinder to get the oatmeal ground finely enough
  • 3 tbsp. corn starch
  • 2 tbsp. non-fat milk powder
    • Similar to my hot cocoa recipe, I really recommend the Market Pantry brand–although any other brand (like Carnation) works as well!
  • 3 eggs, beaten
  • 2 tbsp. light agave nectar
    • Simply Balanced is my favorite brand–it’s sweet but doesn’t add flavor (super key!)

15080303

Directions:

First up, get everything prepped (this makes your life easier in the long run!)…

  • Preheat the oven to 400 degrees F
  • Place the bowl from your stand mixer into your freezer to chill
  • Line a baking sheet with parchment paper or a silicon baking mat
  • In a medium sauce pot, add your water and your butter–set aside
  • Combine all dry ingredients (oatmeal, corn starch, milk powder) in a medium mixing bowl using a whisk or fork–set aside 
  • Combine beaten eggs and agave in a small mixing bowl–set aside 

Next up, get your dough a cookin’…

  • Bring your water/butter mixture to a boil, stirring frequently

IMG_2631

  • Once boiling, carefully dump your dry ingredients into the boiling mixture
  • Using a sturdy spoon (I use a wooden spoon with a sturdy rubber spatula tip) beat, beat, BEAT that dough until it begins to form a a doughy ball (about a minute and a half or so)
IMG_2637
your arm WILL get tired. accept this fact, but know that the deliciousness of your cream puffs will be so. worth. it.
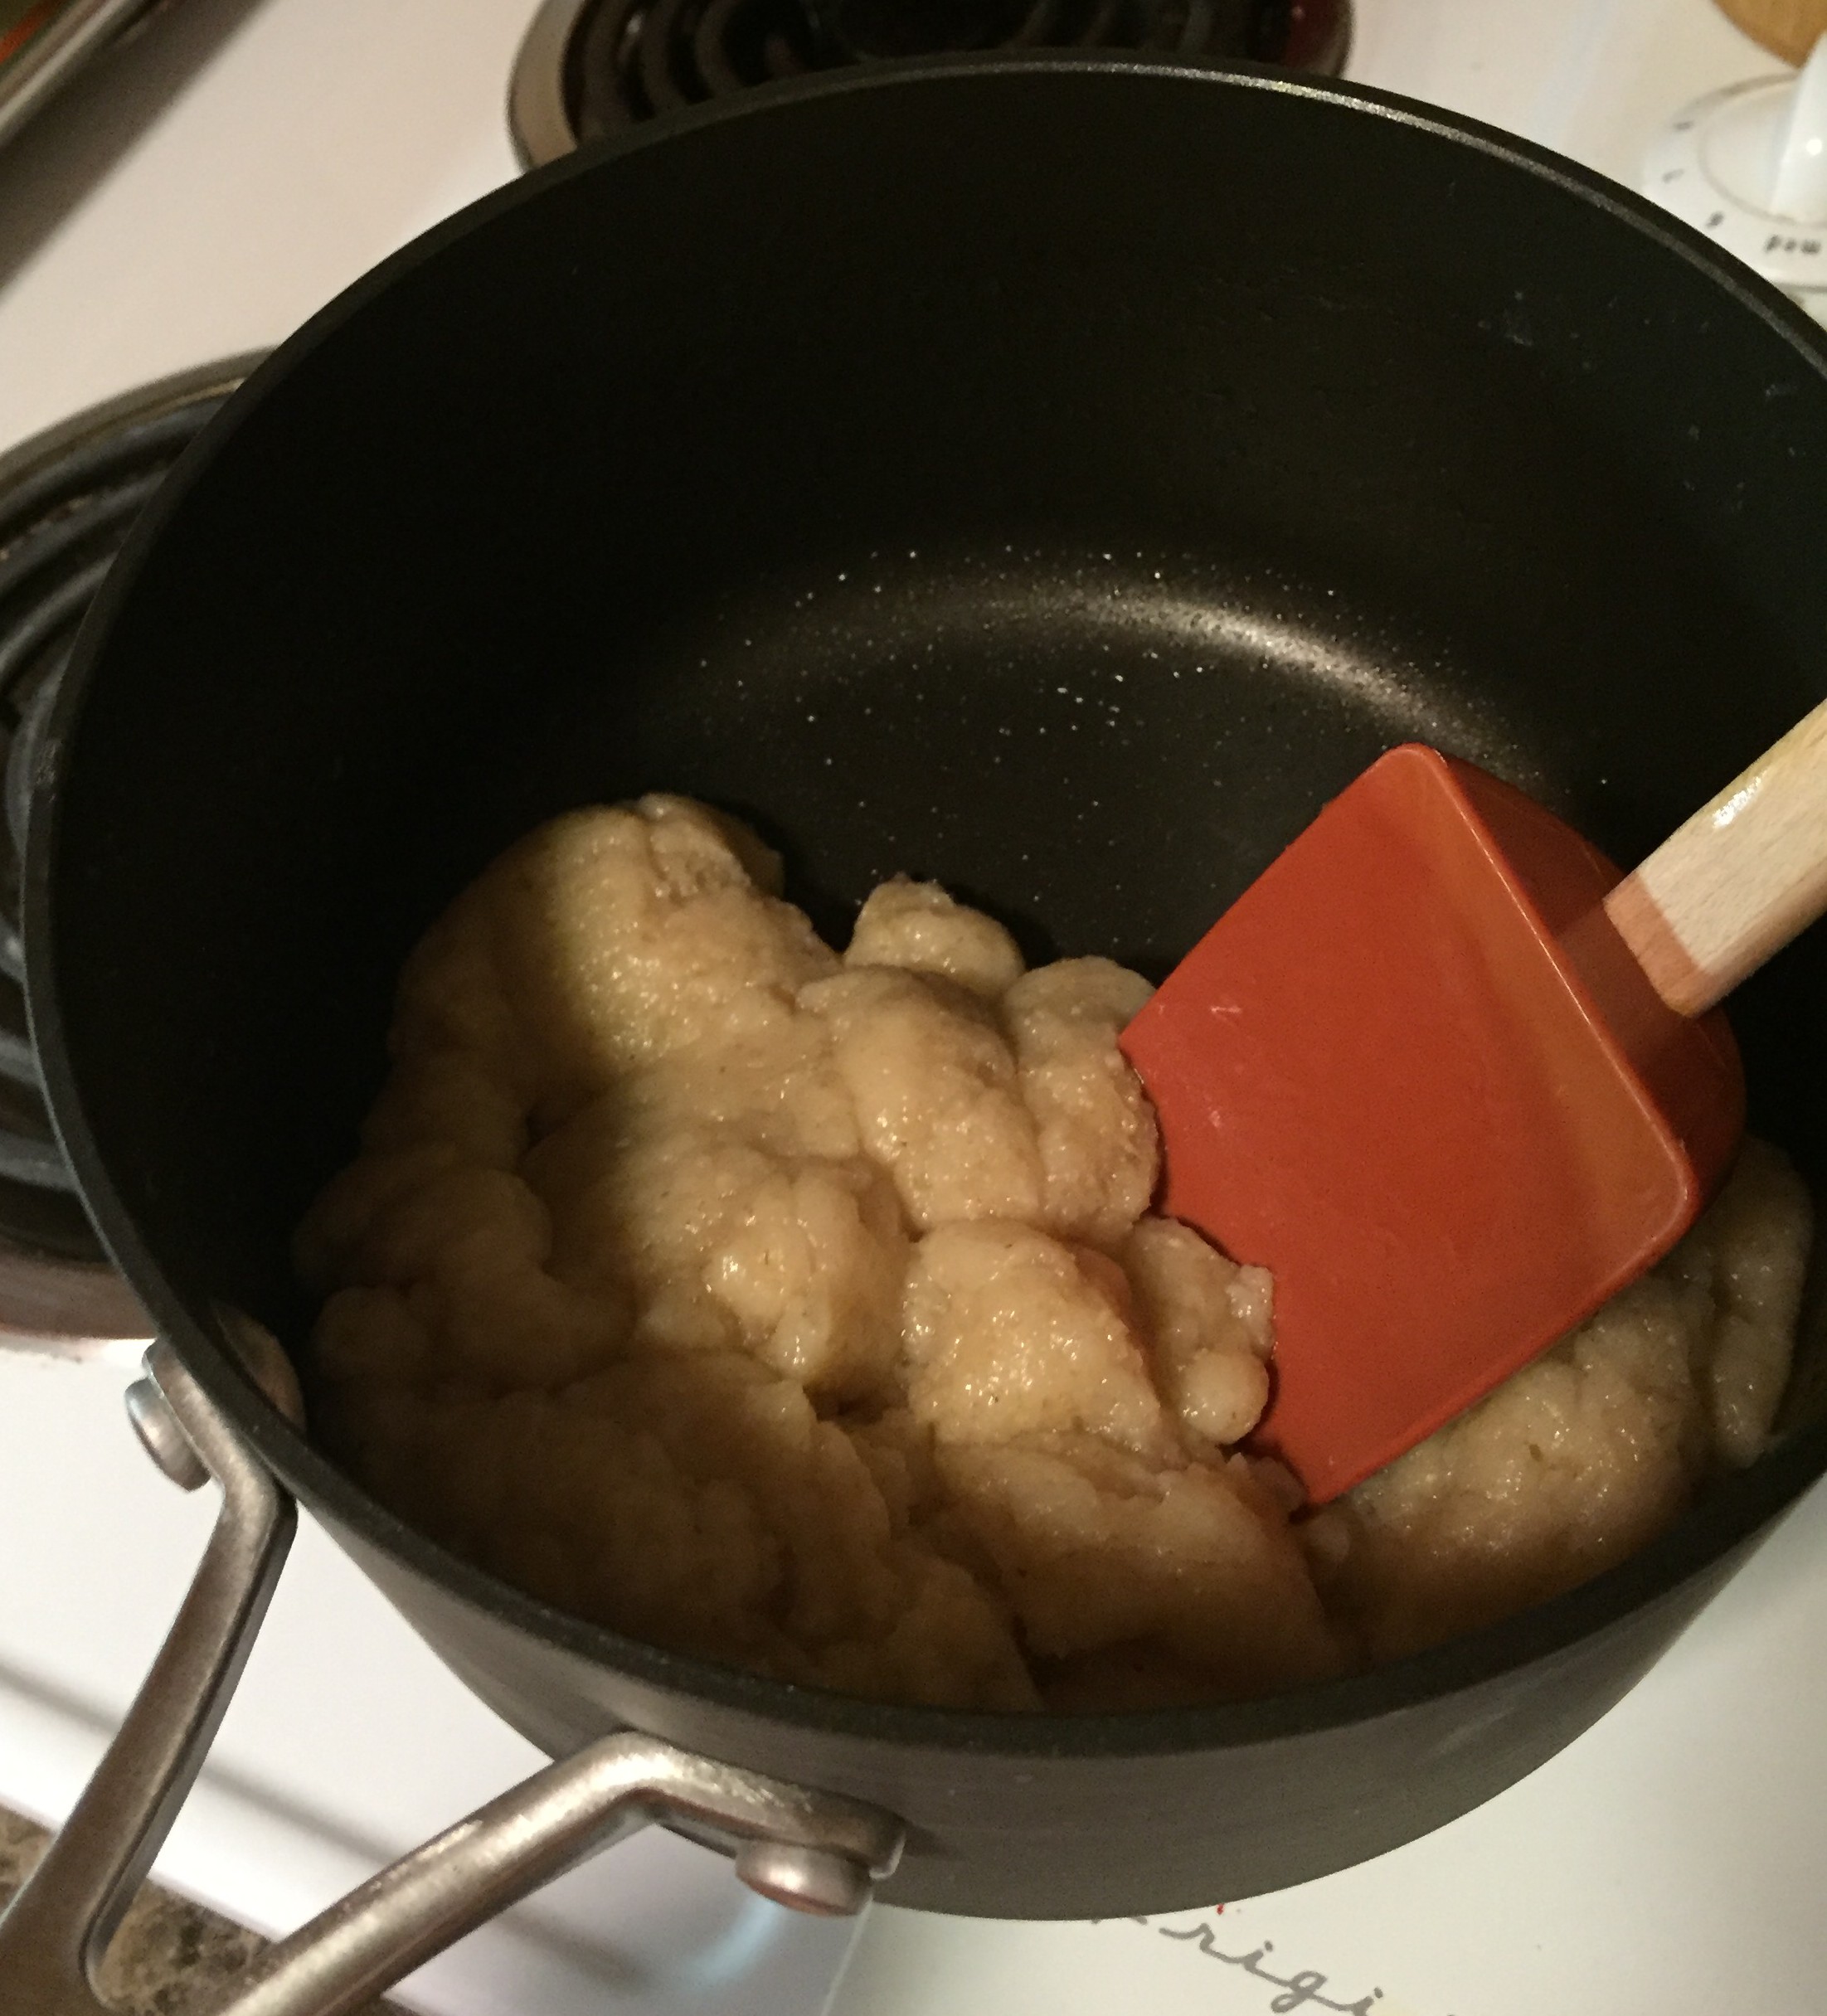
  • After its begun to form into a ball, remove from heat and continue to beat for another minute or so until it has a slight sheen and maintains it spherical shape

After that, get your dough a coolin’…

Note: After you are done beating the dough, it is crucial you give your dough ample time to cool before you add the eggs…you don’t want to cook them!

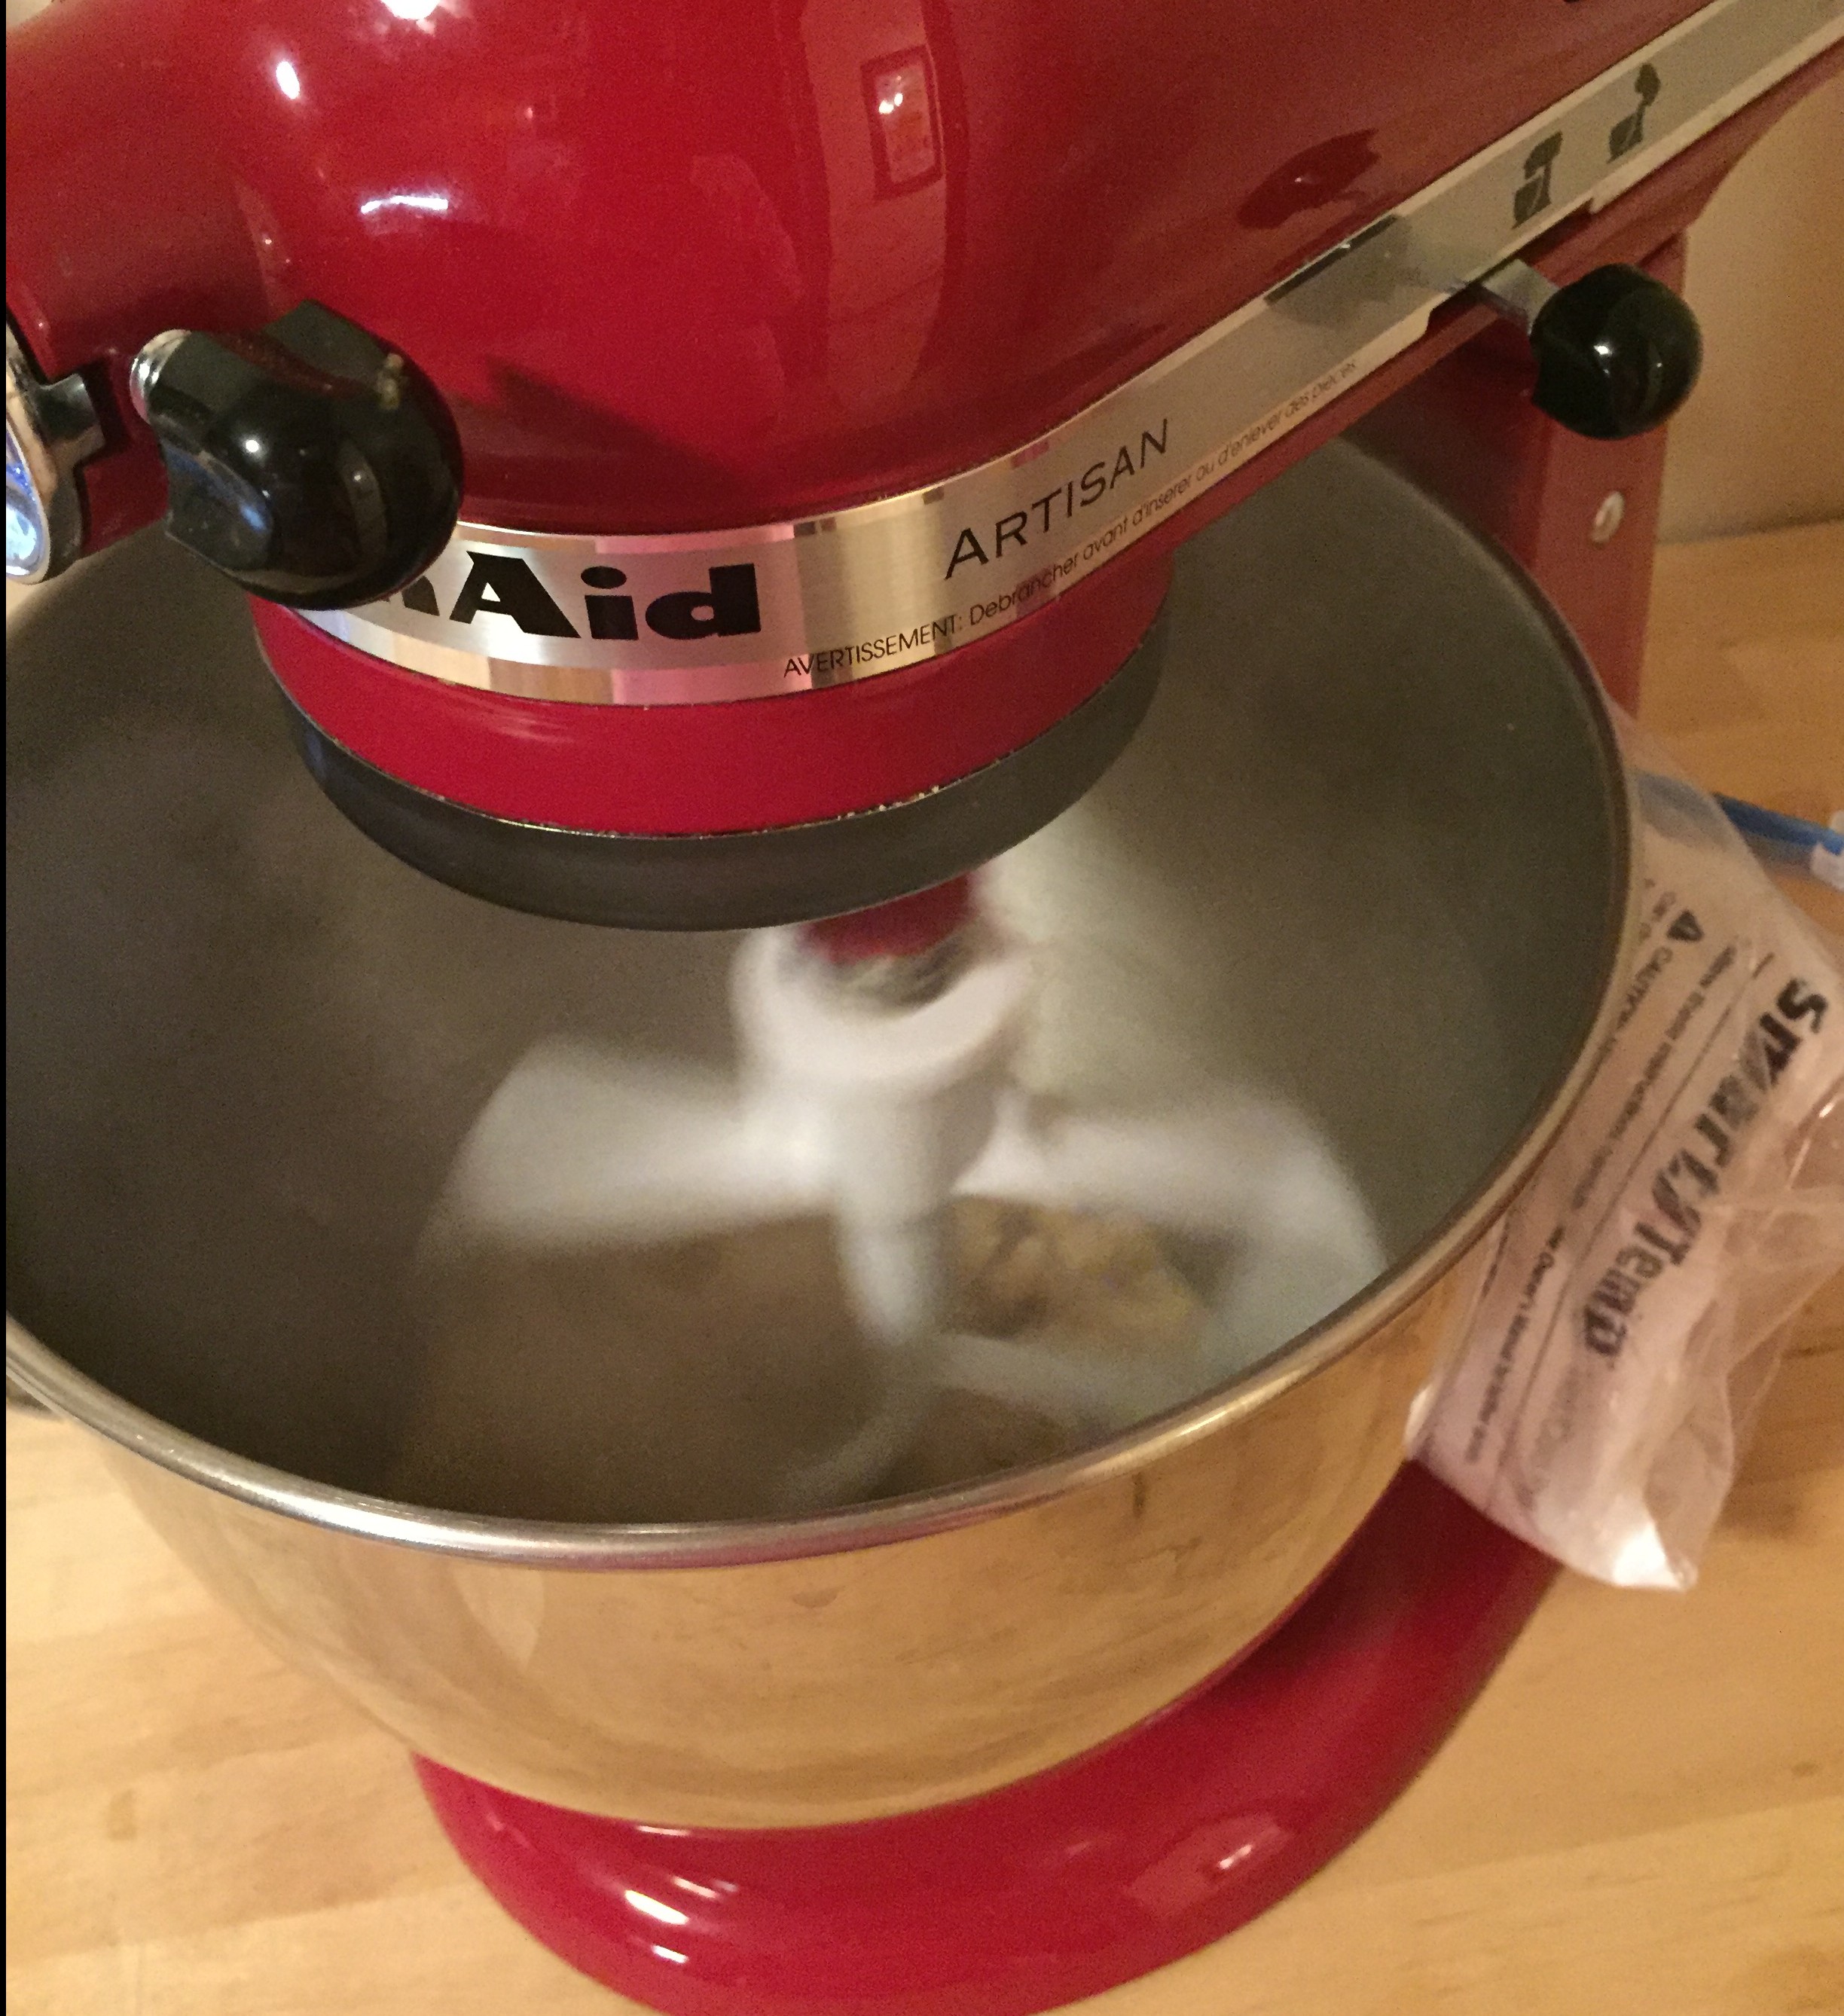
  • Add your dough to your chilled mixer bowl and beat on low for 8-10 minutes
    • For a little extra chill, I sometimes add an ice pack next to the bowl–anything to chill my dough faster!
IMG_2641
note sneaky icepack behind the bowl!

Once cooled, you’re ready to finish your dough…

  • Increase the speed on your mixer to medium-high and ever so slooooowly add your egg/agave mixture to your dough a tablespoon at a time (be patient–only add the next tablespoon once the previous one is completely incorporated!)
    • If your dough starts to look runny, don’t add the remaining mixture–the dough should be smooth and stretchy

Now that’s your dough is done, just get it in the oven…

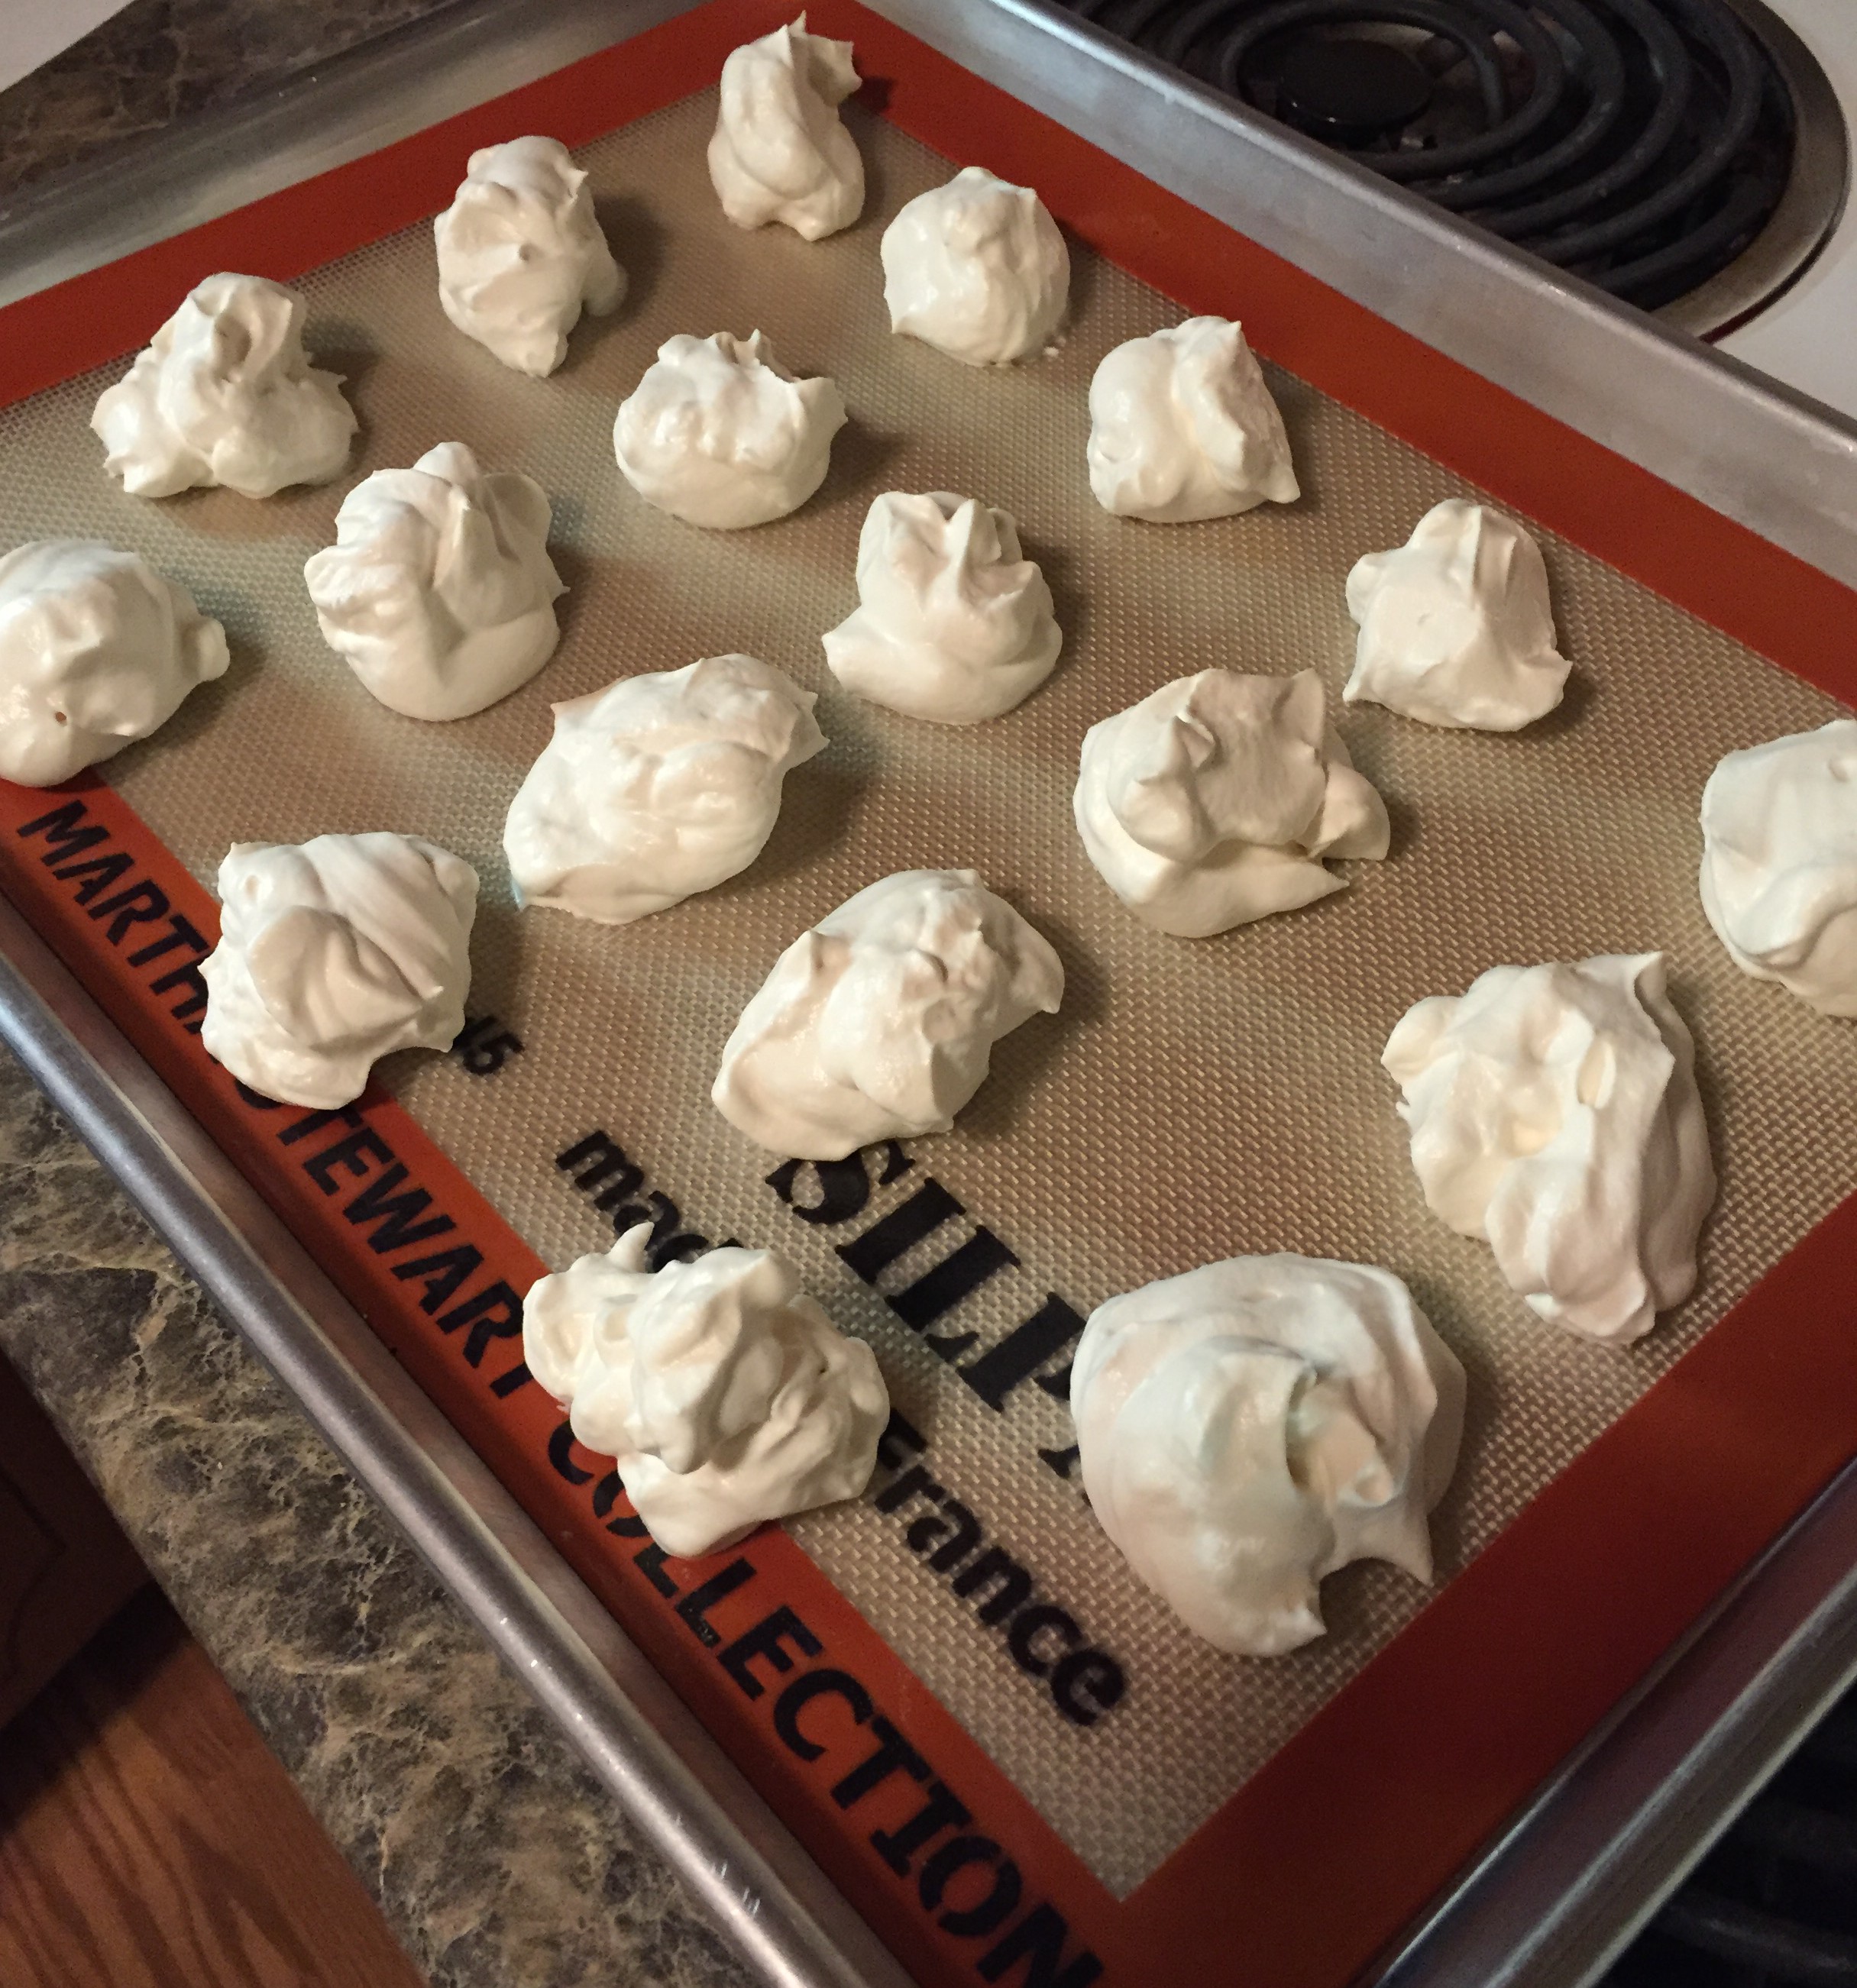
  • On your prepped baking sheet use a pastry bag or a spoon to place tablespoon-sized dollops of dough about an inch apart on the baking sheet
    • If you don’t use a pastry bag, wet your finger and smooth out the tops of your cream puffs to ensure even baking (this will also create a crisper crust for your cream puff!)
  • Place baking sheet in the oven and bake for 10 minutes at 400 degrees F
IMG_2654
You may notice that there are only 13 cream puffs here…I accidentally made the puffs in this batch a bit bigger, but normally I get about 16 cream puffs out of the dough!
  • After 10 minutes have passed, reduce the heat to 350 degrees and bake for another 30 minutes
    • Do NOT open the oven until all 40 minutes of baking time have passed–your cream puffs will de-puff!
  • After your 40 minutes of baking time, turn off the oven and crack it open for 10 minutes
IMG_2655
this may seem odd, but this is super crucial to get them to dry out properly!
  • Following those 10 minutes, close the oven door and let the cream puffs continue to dry out & cool in the off, closed oven for another 20 minutes
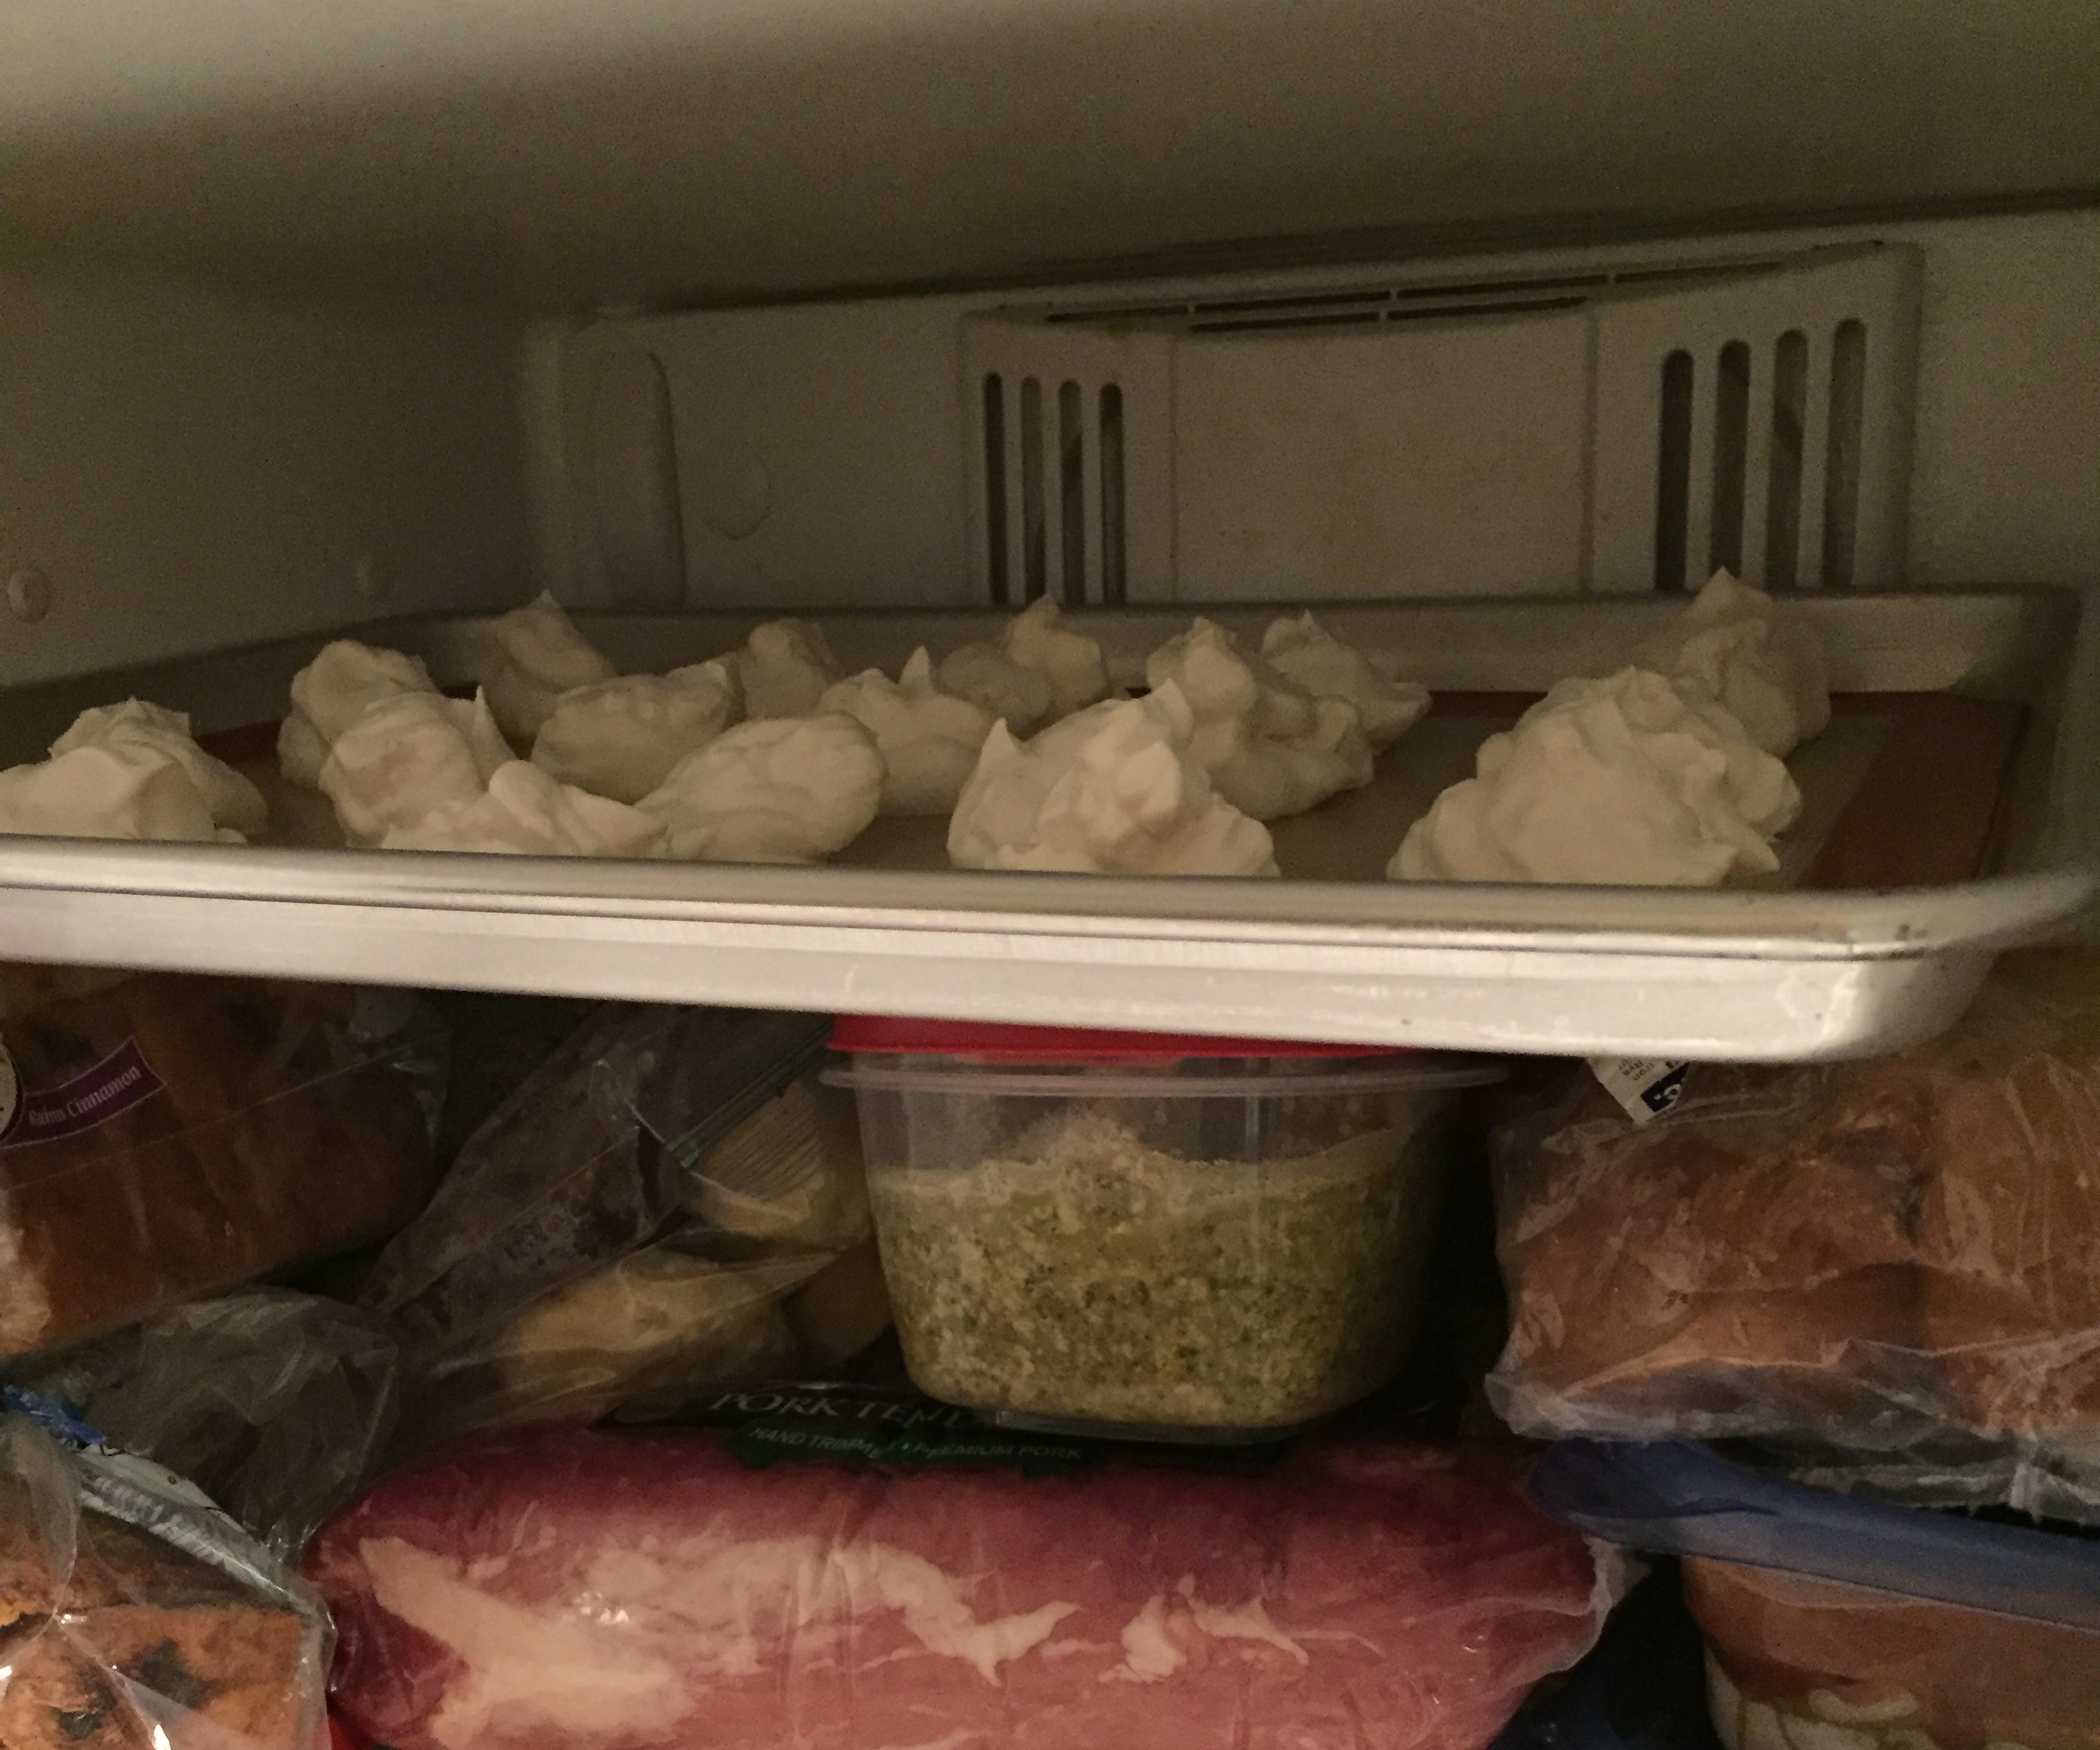
  • After all that (I know, it’s a lot to remember!), your cream puffs are done! Remove them from the oven, place your puffs on a cooling rack, and let them continue to cool for and dry out for at least 6 hours and up to 12 hours

YOU DID IT! But, now that your “fancy” cream puffs are done, you have one of two options:

  1. Eat them as-is (unfilled)
  2. Fill them to the brims with homemade whipped cream

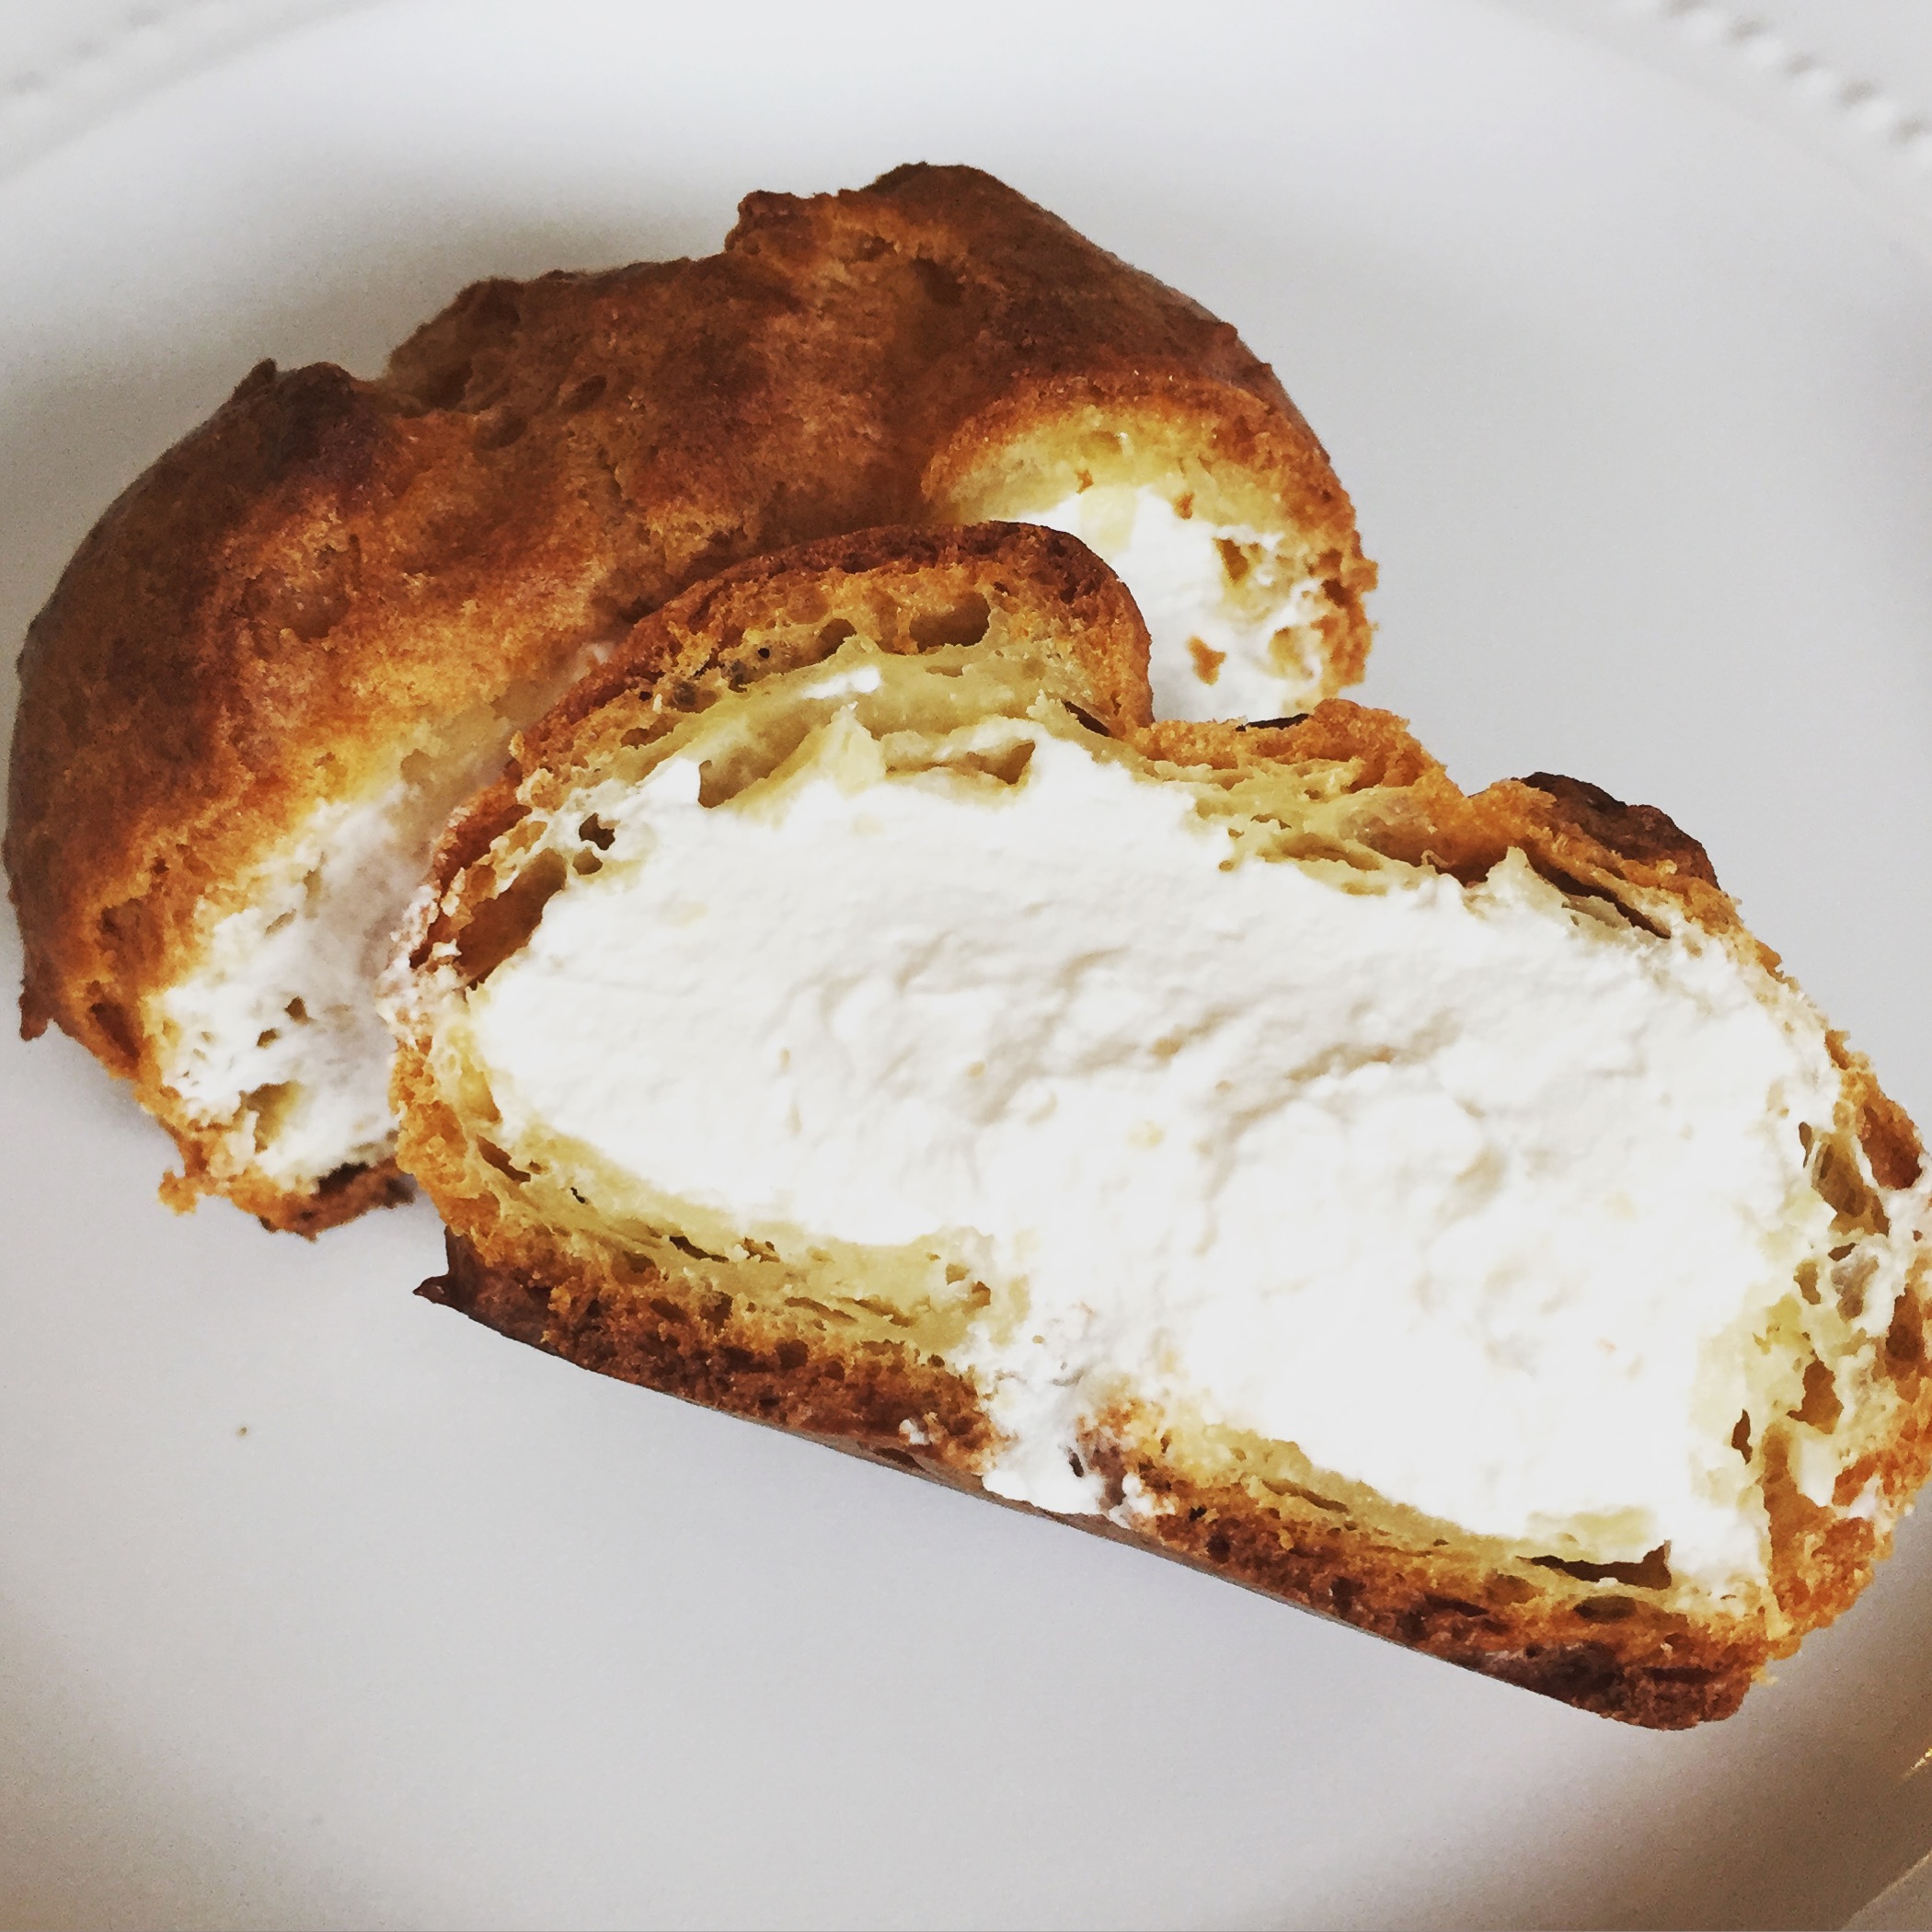
While I can’t believe I’m saying this, OPTION 2 IS THE WAY TO GO. When these babies are filled with my homemade whipped cream, they are to die for.

See Exhibit A:

IMG_2668
you can’t tell…but there is delicious whipped cream in this cute little puff

…and Exhibit B:

IMG_2673
SURPRISE!

…and Exhibit C:

IMG_2674
shut. the. front. door.#ahhhmazing

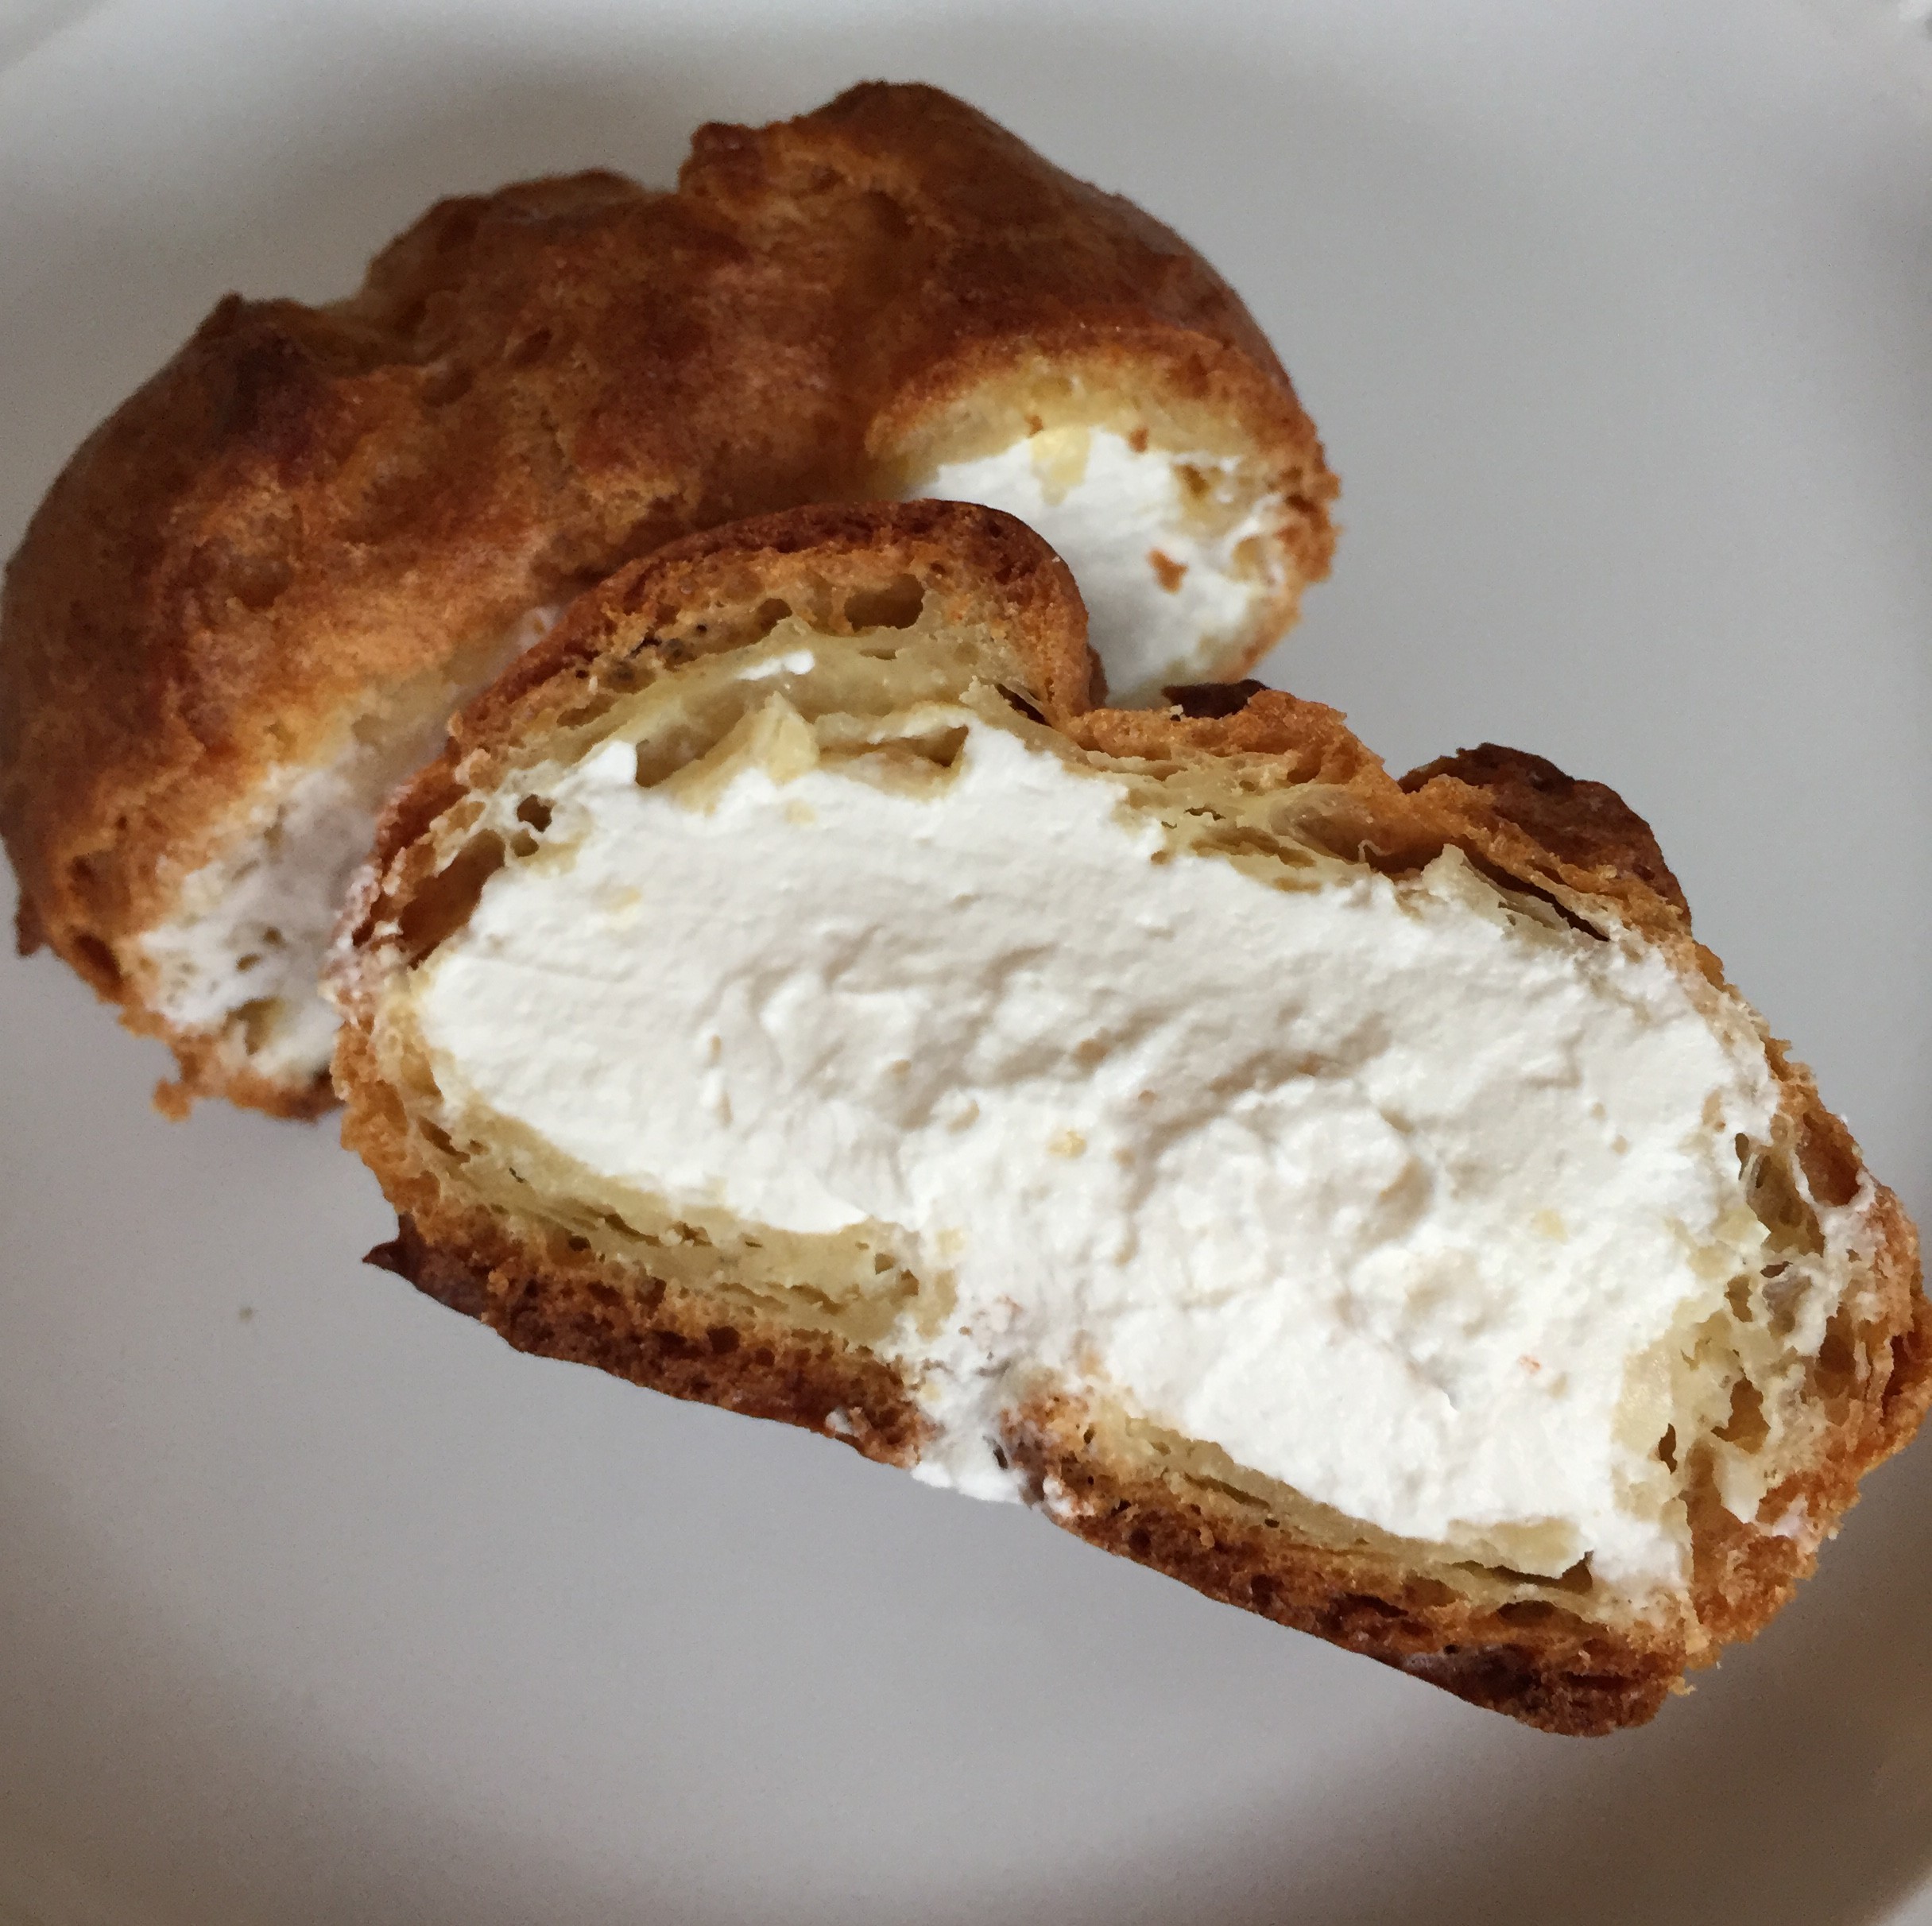
All you need is a mixer and a plastic bag with a metal tip (or, if you’re truly desperate, any can of whipped cream) to take this simple puffed pastry to a new level of profiterole perfection.

From a girl who hates filled things, this is saying a lot. Tom loved these cream puffs, but he also loves basically every food under the sun. When I hesitantly took my first bite of these cream puffs I was prepared for an instant dislike and the dreaded squiirrrrt of the cream to end up all over my lap. But, to my surprise, the flaky crispness of the choux pastry matched with the smooth creaminess of the whipped cream was divine. And the best part? The crust of the pastry was crisp enough that the whipped cream didn’t come spattering out all over me (…as long as I watched that filling hole, that is!)

So believe it or not…I have to admit it: I was wrong. Filled things can be delicious. Tom is jumping for joy that I’ve gotten on the filled bandwagon, and even though I’m still not quite sure if I’m ready to bite into a unmarked jelly donut any time soon, I’m at least I’m willing to try some new things.

And that’s the beauty of marriage: you grow, you change, and you develop new and expanded tastes–in food, in activities (did I mention I (try to) play broomball now?), and in the way you think.

…annnnnd you also have a built-in person who will always take that first bite into your donut to make sure there’s no almond-flavored cream inside. And let me tell you, folks: that’s love.

Here’s to making many more culinary compromises…all in the name of love.

xoxo,

alaina


feeling hot, hot, hot

IMG_2599
our version of warm beverage we can both enjoy: ready-in-under-three-minutes homemade hot cocoa that’s both decadent and refined sugar-free!

When Tom and I registered for our wedding we were thoughtful in only registering for things that we both wanted…with two exceptions:

  • Tom: OXO Storage Containers
    • I thought the tupperware we had both accumulated over the years was good enough, but Tom really wanted these containers. He was never truly able to articulate why he wanted them so badly…although I have my suspicions that it has something to do with him liking pushing the button on top to make them air-tight…
Tom's wish
I’m not kidding…the man loves these containers…
  • Alaina: Keurig Coffee Maker 
    • Although I had already had one, I had lent it to my parents to use since my roommate Birgetta already had one we could use while we lived together. Suffice to say, they loved it so much I never got it back. It was CRUCIAL to me to have a one-cup coffee maker since Tom hates coffee. And since he hates coffee, he had NO desire to register for a coffee maker. 
My NEED
This machine is necessary for my survival.

Luckily, we both got the item that we individually really wanted. Tom got his fun (?) containers and I got the lifeline to my ability to function as a human being in the morning: a COFFEE MAKER.

Beyond registering differences, Tom’s dislike (which is often more like disdain) for coffee frequently arises as a topic for discussion…especially due to the fact that I love it so much I could literally marry it (if I hadn’t married Tom first, of course!)

For instance, when we go out for our beloved donuts, I get coffee…and Tom gets orange juice. When I realize that I will not make it through our #targetrun without some espresso, I get a grande Starbucks latte…and Tom gets a smoothie. On weekday mornings when we’re exhausted, I refuse to leave the house without my mug of coffee…and Tom grabs an energy drink*

{Note: To be fair, Tom is pretty amazing at not drinking much caffeine. He drinks water religiously, he rarely drinks soda, and he powers through most tiredness with a strength that I will never know. His one vice on desperate mornings? Monster energy drinks}

Now for those of you who aren’t new to the blog, you may have picked up on something in the alternatives to coffee that Tom often consumes: they’re all filled with sugar.

THIS is where I found myself struggling this past weekend when we stopped into Starbucks to get my free birthday drink* and I was scouring the menu for something that Tom could get and enjoy that wasn’t filled with sugar. Hot chocolate? 43 grams of sugar. Strawberry lemonade? 32 grams of sugar. Tea? Well…there’s no sugar, but if he doesn’t drink coffee he’s sure as heck not going to like tea. I literally came up with nothing…so he ordered his smoothie and was as content as a clam. But me? I figured that there had to be something better.

{Note: Free birthday drinks at Starbucks are literally one of my favorite things about birthdays. A venti latte with an extra shot? Don’t mind if I do!}

starbucksbday
cue the hallelujah chorus!

As I thought about the fact that there was literally no beverage that Tom and I could both drink and both enjoy at Starbucks (le sigh), I got to thinking about what we could make at home that’s something we could both enjoy during rushed weekday mornings on-the-go as well as during lazy Saturday trips to the bakery or running errands.

Whatever I came up with, I did know that it had to accomplish at least three things:

  • It had to be relatively easy-to-make (for those rushed mornings!)
  • It had to have at least a little bit of caffeine (because I will die without it)
  • It had to taste good with a donut*

{Note: This is probably the most important part. We love our donuts.}

IMG_2540
if whatever I came up with didn’t taste good with donuts, it was a no-go {also, for reference we normally do not order this many donuts…but it WAS my birthday!}

So…where the compromise?

Here’s our answer:

  • Create a warm beverage that can be made from a pre-made mix that can be stirred into warm milk or water to save time on busy mornings
  • Utilize cocoa power for both flavor and a tiny kick of caffeine
  • Ditch any fake sweeteners or syrups that are commonly found in sugar-free coffees and energy drinks and substitute agave nectar

| Donut-Worthy Hot Cocoa |

Serves: 20 Tom’s or Alaina’s

Ingredients Needed:

For the pre-made mix:

  • 3/4 cup cocoa powder
  • 1 cup dry non-fat milk
    • This is key to making it super decadent and also give you the versatility to make this mix with water if you don’t have any milk on-hand!
    • Carnation is the most well-known brand, but I recently stumbled upon a Market Pantry version that comes with three pre-measured one cup pouches…#score
  • 2 tsp cornstarch
    • This makes it so it’s a bit thicker and richer–trust me, add the cornstarch!
  • 2 tsp salt

For the cup o’ cocoa:

  • 1 cup milk or water
    • Milk is eight million times more delicious, but you can always sub water in if you don’t have any on-hand!
  • 1 tsp. light agave nectar
15080303
simply balanced is my favorite–it doesn’t have any additives and there’s only 5 grams of sugar in a teaspoon
  • 1/4 tsp vanilla

For the optional whipped cream:

  • 1 cup heavy whipping cream
  • 2 tbsp. powdered sugar OR 3 tbsp. light agave nectar
  • 2 tsp. vanilla

Directions:

First order of business: make your mix!

  • In an airtight container that can hold all of your dry mix ingredients, add your cocoa powder, milk powder, cornstarch, and salt
  • Closing the container, shake/shake/shake it off until it’s well mixed
  • Store in airtight container for up to three months

{Note: Did anyone else get distracted by that music video? I personally took a good five minute break from writing to dance around my living room} 

ANYWAYS…back to that recipe…

Next up, you’re ready to make your delicious cup o’ cocoa!

  • In a microwave-safe mug, add one cup or milk or water*
  • Warm milk/water in the microwave for 1 minute & thirty seconds
  • Add 1 tbsp of mix, agave, and vanilla; stir until mix is dissolved
  • Return to microwave for thirty seconds; stir well
  • Enjoy!

{*Note: For on-the-go mornings this can be done in any travel mug by adding all the ingredients then adding hot water using the biggest cup setting on your Keurig or any other hot water dispenser}

Finally, if you so desire, you can add some delicious whipped cream…

  • Place metal mixing bowl & beaters in freezer for 15-20 minutes
    • FYI: You can use a hand mixer or standing mixer here!
  • Once chilled, add heavy cream to the bowl and beat on medium-high until soft peaks form

IMG_2567

  • Add powdered sugar and vanilla

IMG_2569

  • Continue to beat on medium-high until stiff peaks form

IMG_2572

  • Add to cocoa and ENJOY!
IMG_2600
the way the whipped cream just barely melts into the top of the hot cocoa is just TO. DIE. FOR.

To make it so your delectable homemade whipped cream doesn’t go to waste and it’s readily available on weekday mornings…try my Grandma Patty’s trick…

  • Scoop tablespoon-sized dollops of whipped cream onto a metal baking sheet lined with parchment paper and/or a silicon baking mat
IMG_2573
you may think this is crazy…but it WORKS!
  • Freeze overnight
IMG_2574
ignore our tetris-style rig to get the pan in the freezer…
  • Once frozen, use a cookie spatula to remove frozen dollops from baking sheet and store in a freezer-thickness zip-top bag
  • Remove dollops of homemade whipped cream anytime you have a need for whipped cream!

Now while that may seem like a lot of steps, the reality is that this diabetic-friendly & Tom-approved hot cocoa is ready in literally three minutes on weekday mornings…and that includes the time it takes to get that delectable whipped cream out of the freezer and pop it on top for an extra-special treat*!

{*Note: You shouldn’t feel that bad about adding the whipped cream–it only adds .8 grams of sugar for a total of 18.8 grams/serving…all of it but .8 coming from the milk (13 grams) & agave (5 grams)! }

This cocoa is truly unlike any other hot chocolate that I’ve ever made. I’ve made “diabetic-friendly” mixes before, but almost every recipe called for some sort of fake sweetener that would give the final product a bit of an off-taste…and it also somewhat freaked me out that I was eating chemicals. This recipe is the exact opposite: the agave adds the perfect touch of natural sweetness without any of the off-flavors.

Even better, this hot cocoa is incredibly rich and chocolatey without being overwhelmingly sweet (I’m looking at you Caribou hot chocolate…bleh!).  The addition of the vanilla adds to the decadent flavor–especially when matched with the base of the slightly sweet milk. The salt rounds out the entire thing, and if you’re feeling crazy and add the dollop of frozen whipped cream? Well…you just may die and go to heaven.

IMG_2601
JUST LOOK AT THAT WHIPPED CREAM.

So while I must admit that this cannot completely substitute my need for coffee, it does actually give you a small kick of caffeine (~8 mg) that can sometimes be just enough to get you going. On top of this, it’s so deliciously decadent I usually forget all about coffee after the first sip.

And, for the record, it passes the donut test. Tom and I both love this easy-peasy drink to take on-the-go or enjoy while we’re cuddling on the couch on a Saturday morning watching Shark Tank* and eating our favorite homemade donuts.

{*Note: Yes, we religiously watch the recording of Shark Tank from the night before every Saturday morning. It’s just so good!}

markcuban
nothing better than our mugs of hot cocoa and the mug of mark cuban on our tv screen #dowehaveadeal?

So while Starbucks may not be able to meet all of our warm beverage needs (bummer, I know), it’s nice that we now have a homemade option that we truly both love. And the best part? I finally found a dish that can use both those containers Tom loves so much and the Keurig I can’t live without. A true win-win and a recipe made in wedding registry heaven.

And Tom has a point…pushing those buttons on those containers is pretty fun.

Here’s to making many more culinary compromises…all in the name of love.

xoxo,

alaina