the great debate

chicken salad
our version of chicken salad: including apples, onions, cabbage, and an asian-inspired vinaigrette

Let me pose a question for you: What’s in chicken salad?

Imagine it in your mind before you keep reading…

  • What vegetables are included?
  • What’s in the dressing?
  • How do you serve it?

This may seem silly, but as I’ve posed this question to more and more people, I’ve found that everyone has a different idea on what should be included in this basic dish.

For example, look what pops up when you type “chicken salad” into Google…there’s no clear consensus on what it should look like:

As you can see, this traditional dish can take many forms. Salty, sweet, crunchy, creamy–you name it, there’s a version of chicken salad that embodies it. While this is typical of many traditional recipes, the point of contention arises when you ask someone what it should look like.

And as it turns out…our relationship was not immune to the lack of agreement on this issue.

{Pause for storytime}

…A few years back when Tom and I were dating, I told Tom that I was making chicken salad for dinner. He was pumped and I was so excited to make it for him since I’d been told multiple times by him and his family that it was one of his favorite foods. 

Tom showed up after work for dinner and I still remember his exact words–said in his oh-so-polite and tremendously sweet demeanor:

“This looks great, babe…but this isn’t chicken salad

Ummm….what? I was baffled. Of course what I gave him was chicken salad. What was he thinking?!

This event began the great debate in our household: what is supposed to be in chicken salad?

Here were our thoughts:

  • My idea: Chicken, Miracle Whip, & Celery
  • Tom’s idea: Chicken, Pasta, Peas, Egg, Celery, Mustard, Miracle Whip, & Mayo

As you can see, the simple chicken salad I served Tom that evening left him with a lot to be desired compared to the more bountiful salad he was used to. And on my end, I argued that if there’s pasta in it, it’s pasta salad not chicken salad.

We’re both not typically stubborn people, but on the “chicken salad debate” we both weren’t budging. In the days following, I remember asking almost everyone I came in contact with about what they thought should be in traditional chicken salad

{I know, I know–I’m a riveting conversationalist–chicken salad is my hot topic}

At the time, I thought that my then-boyfriend was crazy to think that pasta was included in chicken salad…and he thought I was crazy to think there wasn’t.

Turns out, Tom and I weren’t alone in our disagreement over something so seemingly simple. As humans, we have an emotional tie with the food we ate growing up. It’s not just about the food–it’s about the memories and feelings that we associate with those meals. For both Tom and I, this basic traditional dish was a meal we were raised on…and one that we couldn’t imagine being served to our own family in any other way.

With such (surprisingly) strong beliefs held on both sides, compromising on chicken salad wasn’t as simple as swapping ingredients.

So…where’s the compromise?

Here’s our answer:

  • Re-imagining the dish by removing the creamy dressing and replacing with an Asian-inspired vinaigrette
    • This dressing is based on my grandma’s dressing for her ramen salad–if you’ve ever had this type of salad and liked it, you’ll love this dish!
  • Adding texture and body by adding chopped apples and sweet yellow onions–ingredients that we both love
  • Elevating the nutrient-density by making the base of the dish tri-colored slaw–including carrots (Tom’s favorite), red cabbage, and green cabbage
  • Keeping it simple by using pre-pulled rotisserie chicken

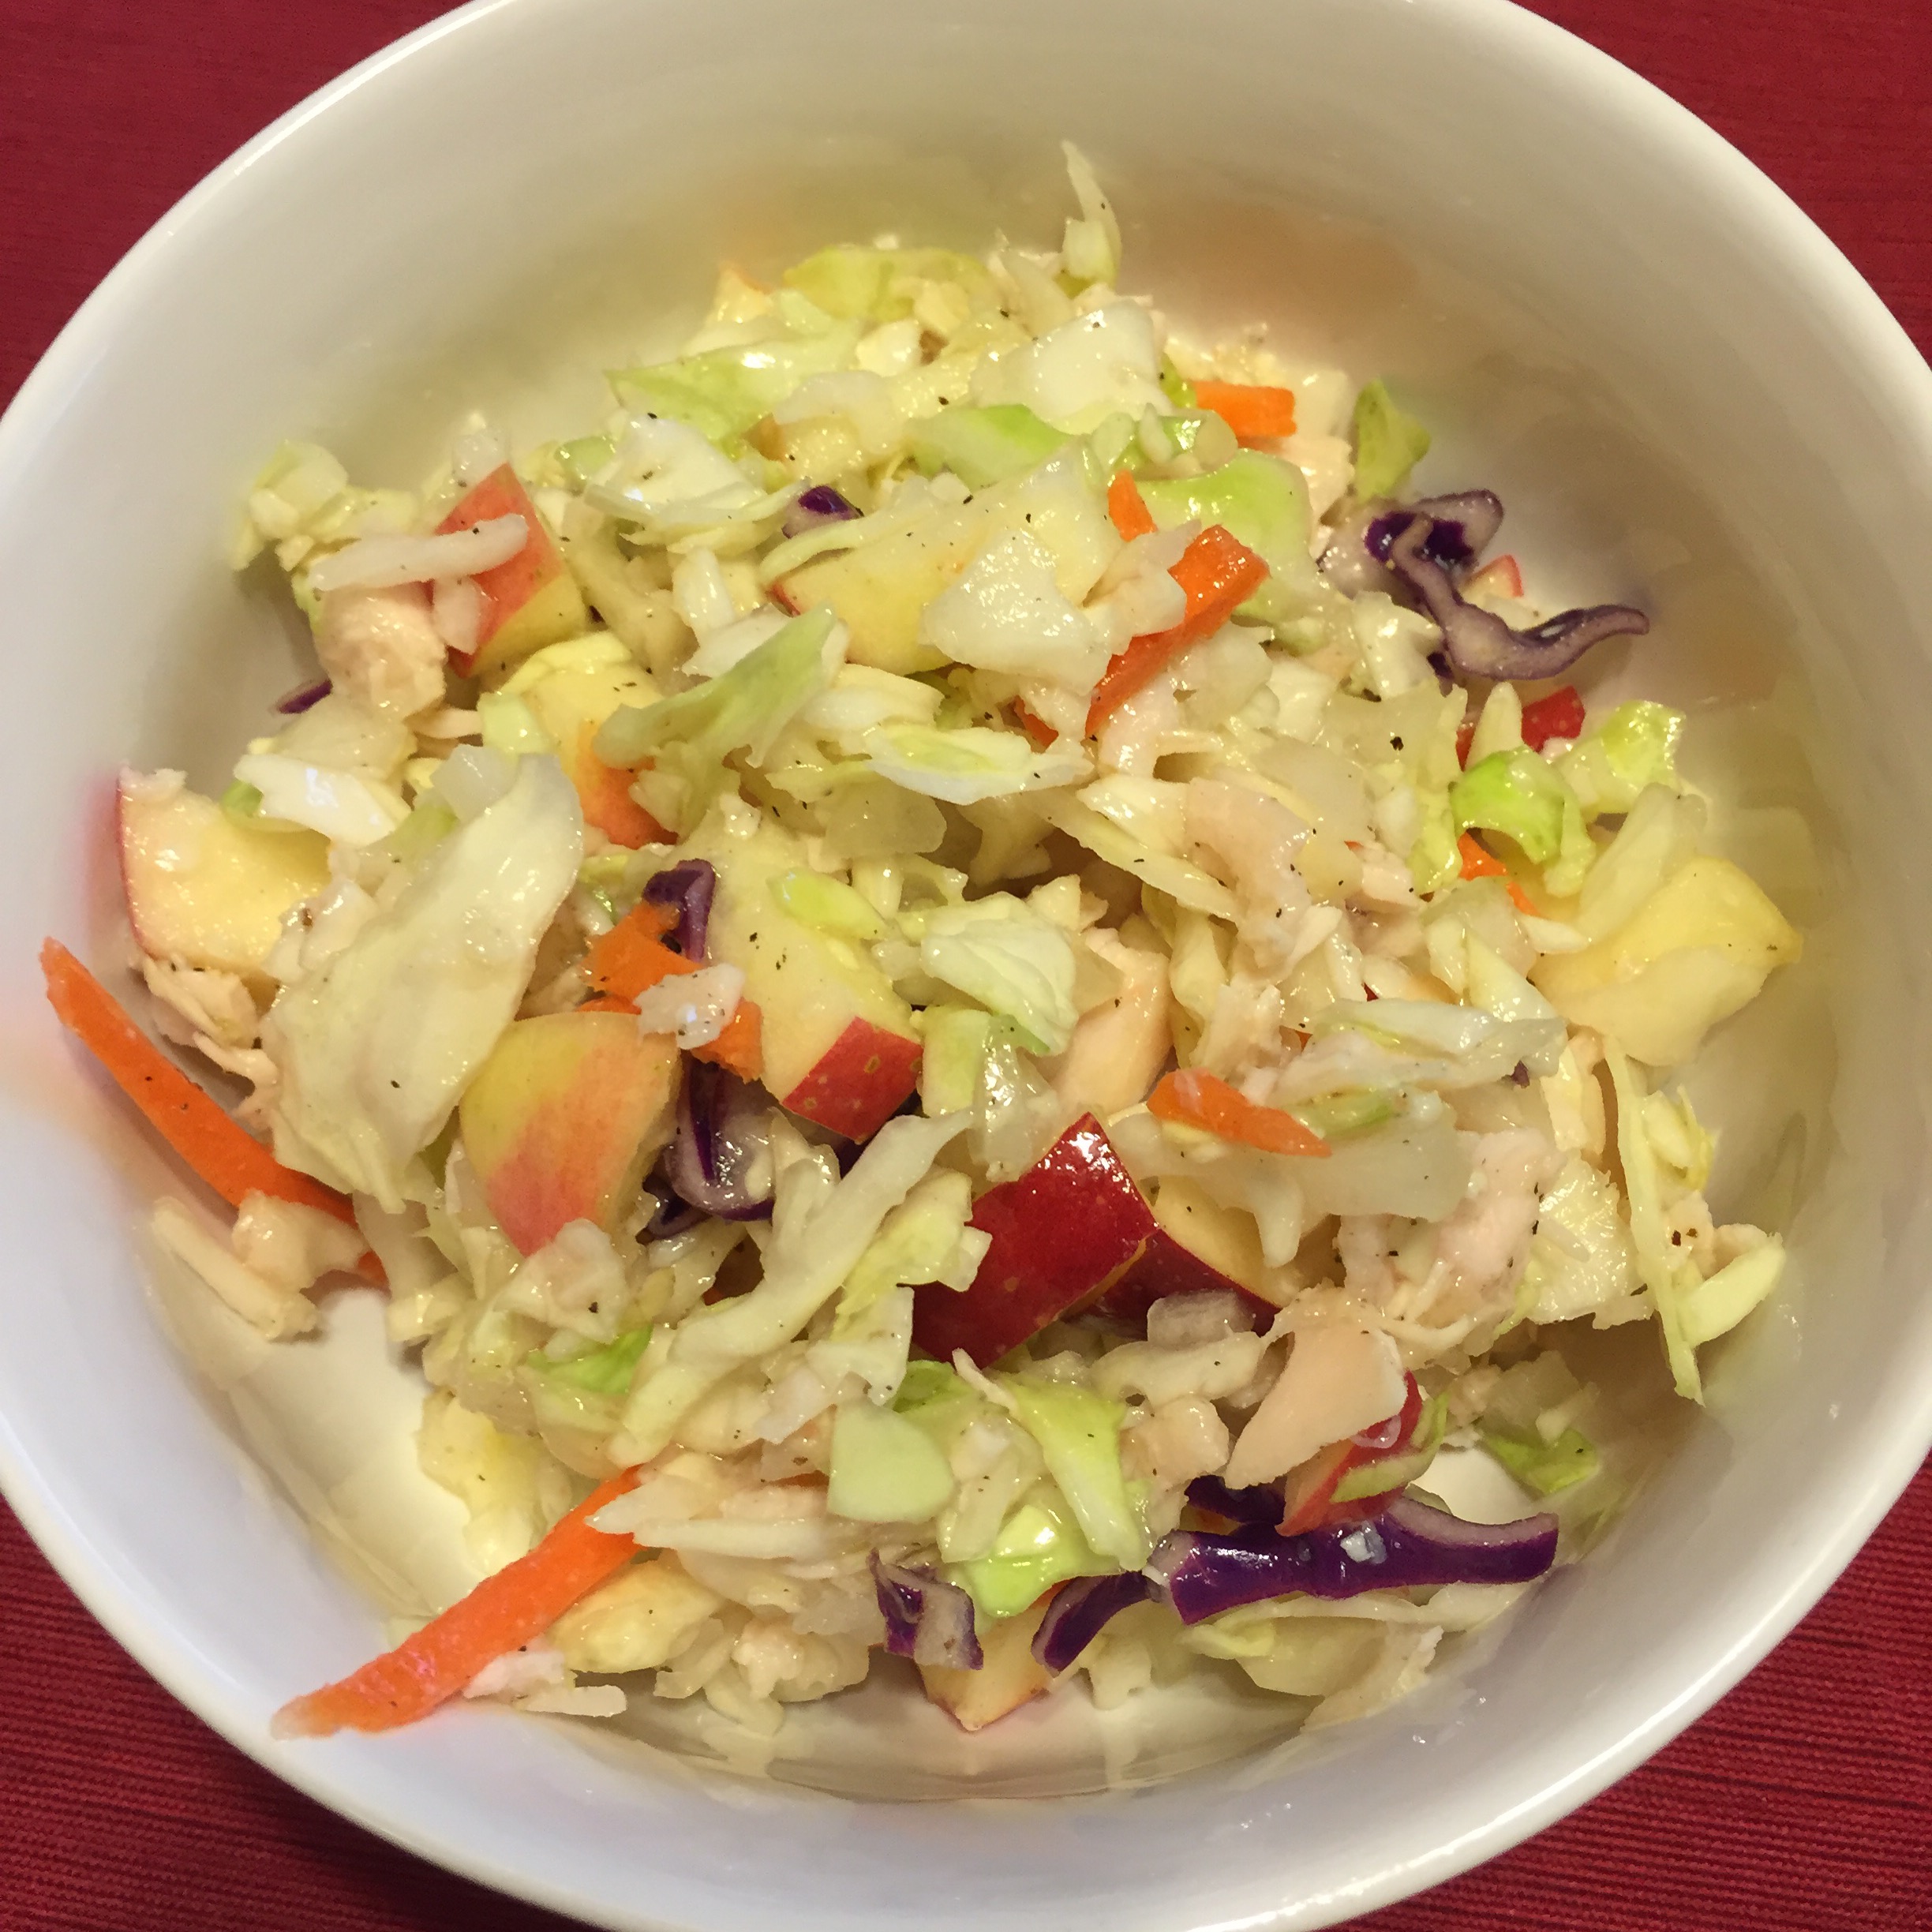
| The Johnson’s Chicken Salad |

Serves: 6 Tom’s or 8 Alaina’s

{Slightly embarrassing note: I know I said this dish serves 6-8…but Tom and I have been known to devour this salad between the two of us in two days…it’s that good}

Ingredients Needed:

For the salad:

  • 2 packages tri-color coleslaw, pre-washed
  • 2-3 heaping cups of rotisserie chicken, chopped
    • Get it at Costco. Watch your life be changed forever.
  • 1 large sweet yellow onion, diced
  • 3 medium apples, diced
    • Honeycrisp is our favorite here (what’s new)–but SweeTango or Fuji are delish as well!

For the dressing:

  • 3/4 cup seasoned rice vinegar
  • 1/2 cup oil
    • Use olive oil if possible–but any oil will do
  • 2 tbsp. sugar
    • You can substitute sweetener–and as a pre-diabetic I’m tempted–but you only end up using 75% of the dressing and the recipe makes eight servings…so just use the sugar. It’s (arguably) better for you than putting chemicals in your body!
  • 2 tsp. salt
  • 1 tsp. black pepper

Directions: 

First make your salad…

  • In a large bowl, dump in both packages of slaw
  • Add chopped chicken, apples, and onion
  • Toss ingredients together until they are mixed well
    • If ingredients look unbalanced–add a little more of whatever you like best! You can’t screw this dish up. 

Then make your dressing…

  • In a dressing shaker or other jar/bottle with a lid, add all dressing ingredients
  • Shake well

Then put it all together…

  • Pour about 60-70% of the dressing on the salad; toss
  • Taste–if well-combined and coated…you’re done! Otherwise, keep adding and tossing until the salad has the ratio of dressing to salad you like best
    • For reference, I usually use about 75% of the dressing
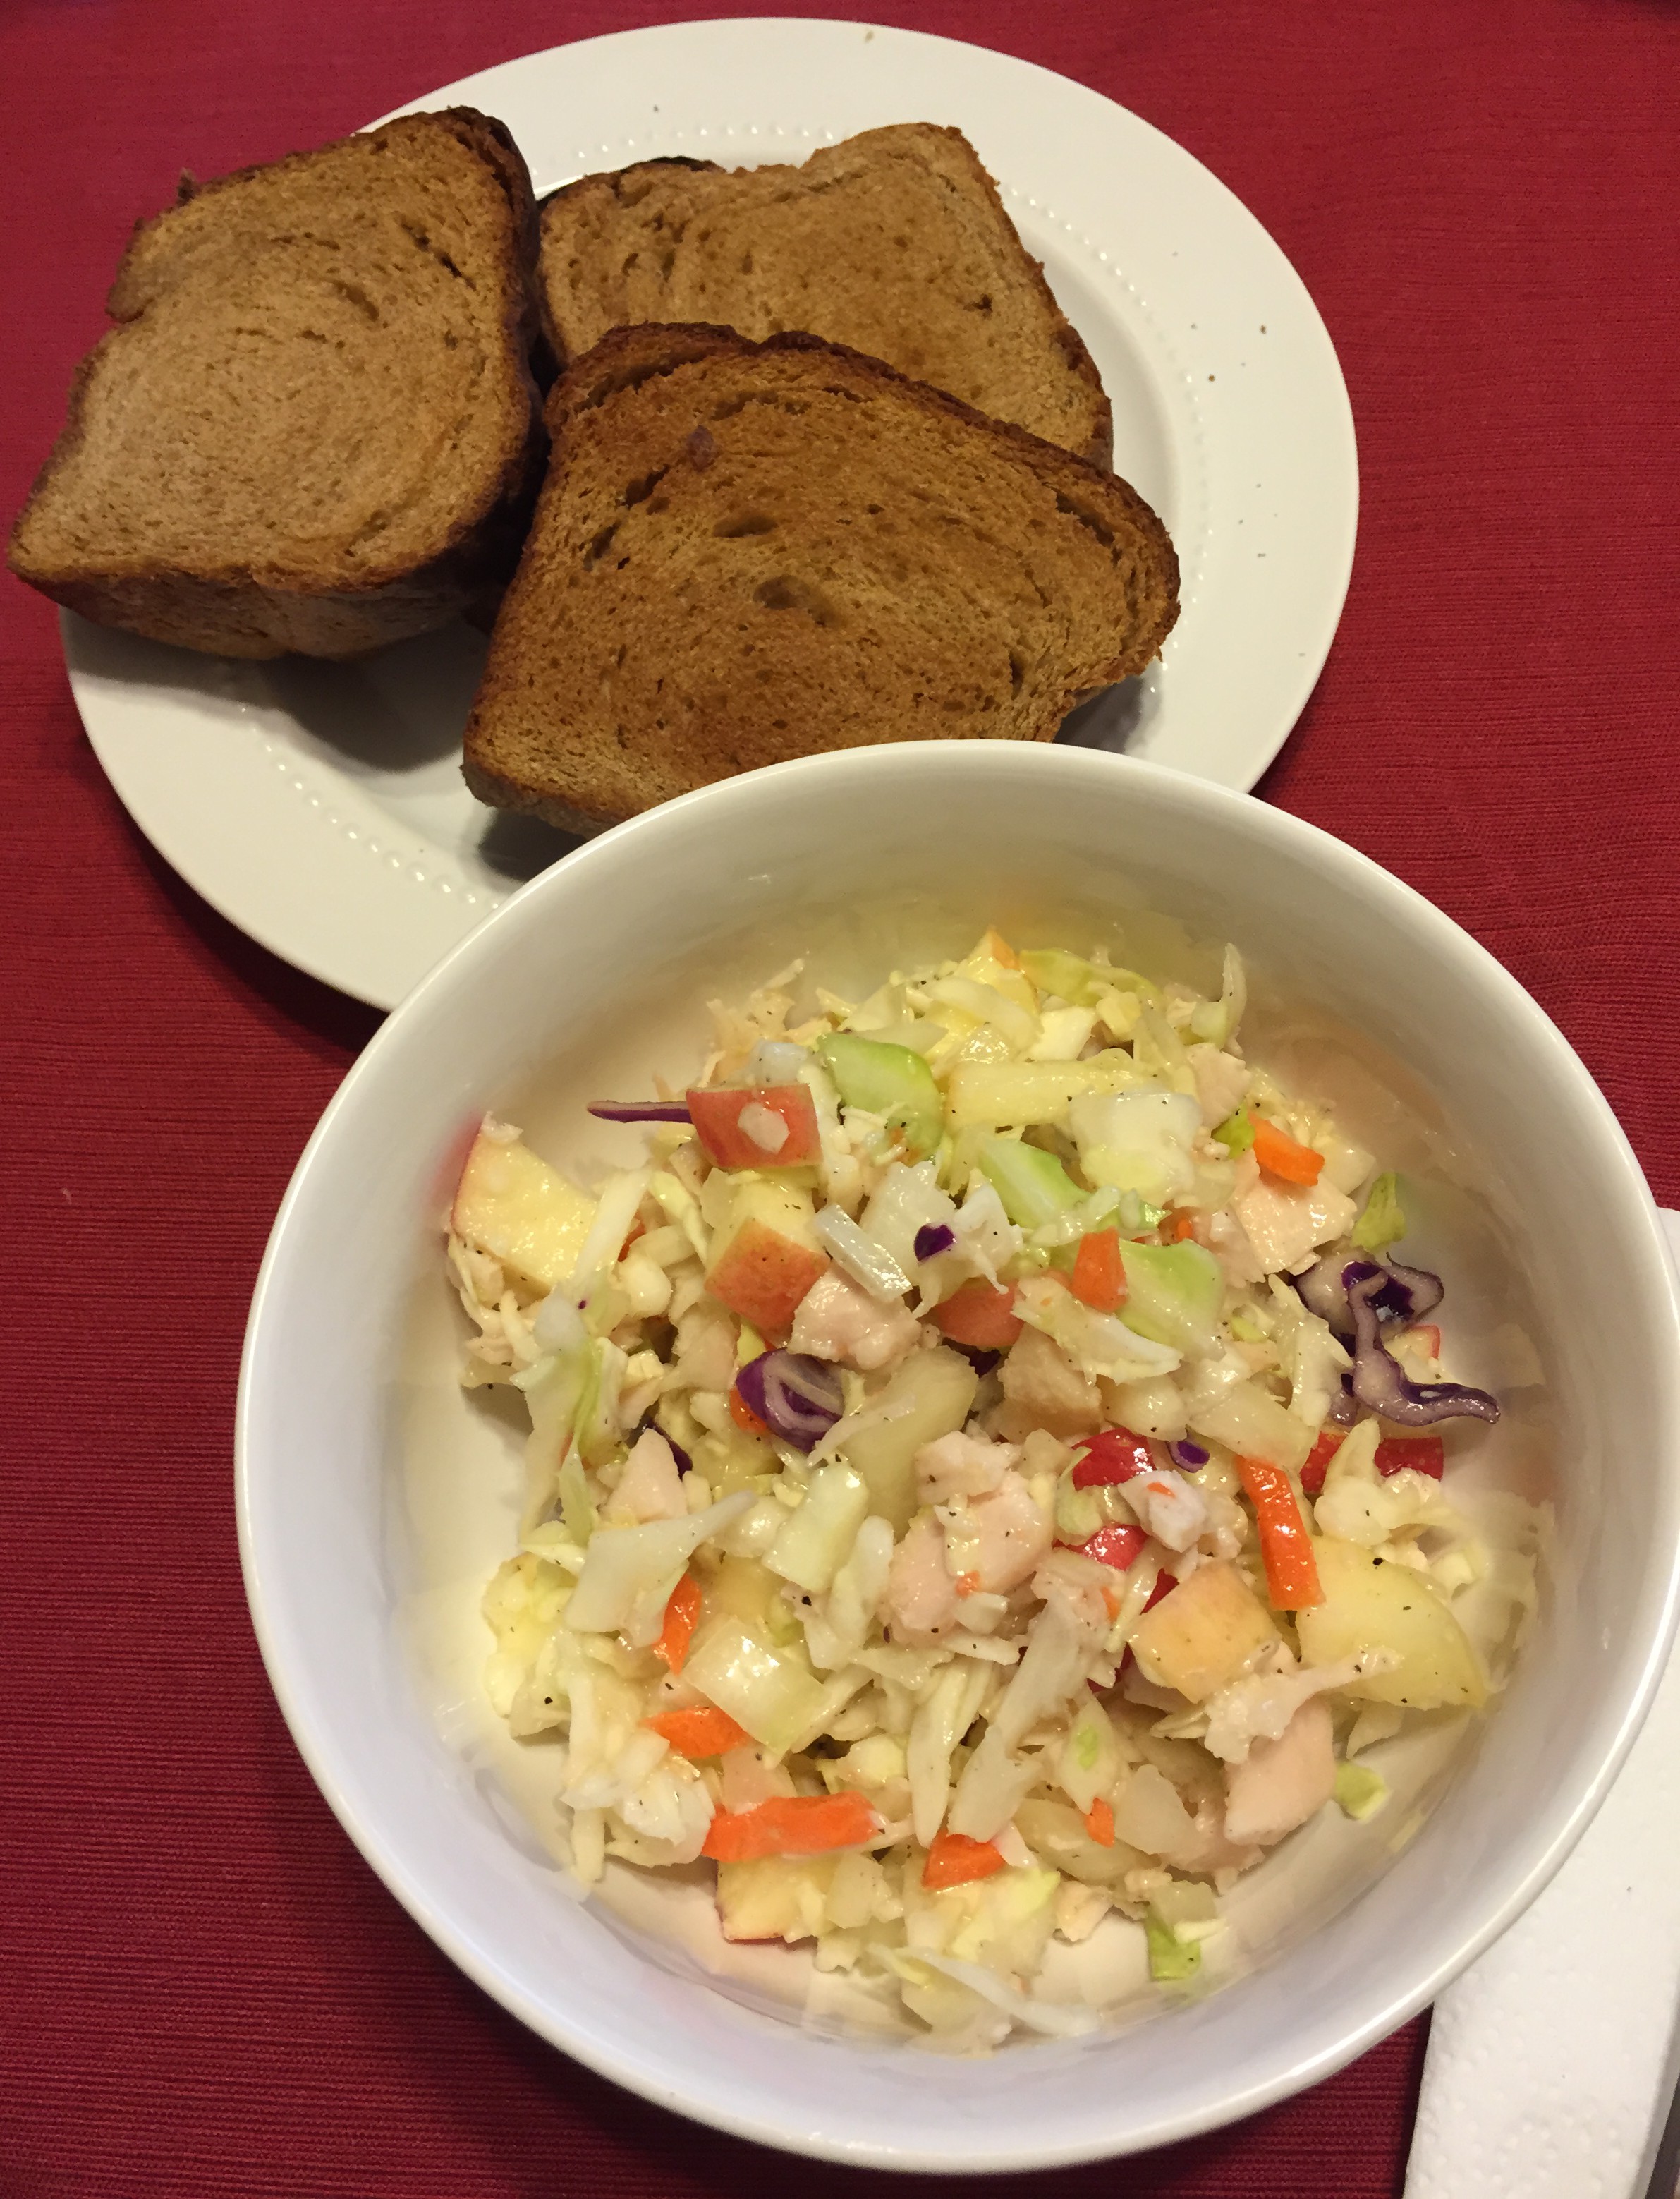
Then serve!

  • This chicken salad is truly a one-dish meal–but feel free to serve it with a side to make it more substantial
    • We love having a slice of Swedish Orange Limpa on the side–the subtle sweet flavor of this bread pairs perfectly with the sweet tang of the dressing on the salad
    • If you don’t have limpa handy (I know most people don’t) any subtly sweet bread like a rye or beer bread also pairs well
salad with bread
chicken salad + limpa = perfection.


This recipe is truly one of our newly-formed family’s favorites. It’s beyond simple, it tastes delicious, and it makes for amazing leftovers (and lunches!) for up to four days after.

All in all, what this dish has taught us is that there isn’t always an easy compromise when it comes to cooking…or to marriage. Sometimes it’s less about compromising and more about co-creating something entirely new for our little family of two.

So far, our married life has meant new foods, new traditions, and new ways of working. Marrying our tastes is not always easy–but it’s definitely worth it. 

Here’s to making many more culinary compromises–or, in this case, culinary creations–all in the name of love.

xoxo, alaina

meat & potatoes


cr&k
my version of meat & potatoes: country ribs & caraway kraut with cauliflower mash and honeycrisp apples

Before Tom and I got married, I received 95% of my protein intake from greek yogurt & peanut butter.

It’s not that I didn’t like meat, it’s just that it seemed like a lot of work to make when I was only cooking for one. Also, peanut butter is basically the most delicious food on earth.

{Note: I have recently been trying to cut back on my peanut butter intake. I used to be able to eat an entire Jif Whips container in a little over a week–which is, you know, maybe a tad bit (okay, extremely) excessive. I have literally been going through peanut butter withdrawals.}

pb
Oh peanutty goodness…I miss you with my morning apple…

Sorry—must. stop. dreaming. about. peanut. butter. Okay, what was I saying? Oh right: PROTEIN.

When Tom and I got married, I knew I had to expand my horizons in the whole protein-arena…so I went back to my grandma’s cookbook (aka my cooking bible) to try and find some recipes that would satisfy his desire for what I knew he wanted more than anything: good ol’ meat & potatoes.

While I was searching, I stumbled upon an old family favorite: Country Ribs & Kraut–the one recipe in my family’s repertoire that leans on our non-Scandinavian background and actually embraces our German roots. It’s got meat, it’s got sauerkraut, and it’s got mashed potatoes.

Would Tom love this? Check, check, & check.

I’d cooked this recipe a few times before for special occasions (like when we asked our best friends in the whole world to be in our wedding party) because it’s a dish that just feels familial, warm, and inviting. It’s a cozy meal that’s meant to be shared, and it’s one that you will almost have to share with your neighbors if they catch a whiff of its enticing aroma that’s delectably both sweet and savory. And that’s just the smell.

friends
Our best friends that we asked to be in our wedding party while serving them this dish. Disclaimer: The food did not make us look like this. We’re naturally a little weird.

So, as you can guess, there was only one problem with this amazing dish: I hesitated in wanting to cook it regularly because of the potatoes. Why? Lots of carbohydrates + pre-diabetes aren’t exactly an award-winning recipe. And the mashed potato substitute recipes I had tried before tasted like (in Tom’s words) “cauliflower cream-of-wheat“.

Um, gross.

So, where’s the compromise?

Here’s our answer:

  • Delicious melt-in-your-mouth (and almost sinfully simple) pork country ribs
  • Mellowed caraway sauerkraut with a perfect balance of both sweet and sour flavors
  • Surprisingly delicious cauliflower mashed “potatoes” made with cottage cheese
    • Most cauliflower mash recipes either call for cream cheese (might as well eat the real deal at that point) or 0% greek yogurt (no fat=no flavor). 2% cottage cheese is the secret ingredient here…and one that was Tom’s idea!
  • A side of perfectly in-season honeycrisp apples that complements the pork perfectly

| Country Ribs & Caraway Kraut with Cauliflower Mash and Honeycrisp Apples |

Serves: 6 Tom’s or 8 Alaina’s

Ingredients Needed:

For the ribs & kraut:

  • 8 boneless pork country ribs (about 3 1/2 to 4 lbs of meat–buy it in a family pack!)
  • 1/4 tsp. salt
  • 1/4 tsp. pepper
  • 2- 14 oz. cans of sauerkraut
  • 4 tsp. caraway seed

For the cauliflower mash:

  • 2- 12 oz. bags of steam-in-the-bag frozen cauliflower
  • 1 cup 2% cottage cheese
  • 2 tsp. chicken stock
  • 2 tsp. minced garlic
    • Yes, you need the garlic–it’s the magic that takes away the cauliflowery-ness! 
  • Salt/pepper to taste (around 1/8 to 1/4 tsp. of each)

For the side:

  • 1 large Honeycrisp apple, sliced
    • You can also substitute other crisp apples like SweeTango or Fuji

Directions:

  • Preheat oven to 350 degrees F
  • Prepare ribs
    • Generously salt and pepper both sides of the ribs and place in an ungreased oven-safe dish that can hold all ribs without overlapping
  • Cook ribs uncovered in the oven for 25 minutes
raw neat
see that salt and pepper? be generous!

While the ribs are cooking, mix your kraut…

  • Empty two cans of sauerkraut (including juices) into a bowl
  • Stir in caraway seed

BEEP, BEEP, BEEP! 25 minutes have passed and your ribs are ready to be added to the kraut…

  • Remove ribs from pan and place on a plate; set aside
  • Add your caraway kraut to the rib pan and stir it in with the juices the ribs left behind
  • Replace ribs on top of the kraut–ensuring they are flipped so that the side that was on top during the first part of cooking is now on the bottom
  • Return dish to oven and set timer for 45 minutes
replace ribs
flipping the ribs over is a big key to success

While the ribs & kraut are becoming even more delicious, make your mash…

  • Cook your bags of steam-in-the-bag cauliflower according to the directions on the package (usually about 6 minutes a bag)
  • Once steamed, carefully dump your steamed florets into a food processor (be so careful opening those bags after microwaving…it’s so easy to burn yourself!)
  • Process on low (pulsing, if needed) until all florets are crumbled
  • Once crumbled, add half of the cottage cheese and pulse to combine; then remove lid and stir in 1 tsp. of the chicken stock
  • After stirring, add remaining cottage cheese and pulse to combine; then again remove lid and stir in second tsp. of chicken stock
  • Add minced garlic, salt, and pepper and then quickly pulse to mix (be careful not to over-process!)
  • Empty mixture into oven-safe container and pop into the oven uncovered with your ribs
    • They can cook for as little as fifteen minutes or as long as a half an hour–just keep them in until your ribs are done
    • The point of putting them in the oven is twofold: 1) To get the cottage cheese to slightly melt and make the mixture more creamy and 2) To keep them warm!
mash
looks like a lot of steps–but I promise it’s super simple to make these fake potatoes!

BEEP, BEEP, BEEP! 45 minutes have passed and your ribs should be done…

  • Check ribs–if sauerkraut is bubbling away and the ribs have slightly browned–you’re ready to go; if not yet done, continue checking every five minutes
final
so. good.

Time to plate!

  • Remove ribs and mash from the oven
  • Prepare plates with ribs and kraut spooned over the mash
  • Serve with sliced apples

YUM.

Beyond the fact that this recipe is beyond tasty, it’s amazing for other reasons too:

  • It’s crazy cheap–all of the meat in this dish should cost you $7 to $8 dollars
  • It’s crazy easy–it’s simple enough to do on any weeknight…and there’s not even much clean-up!
  • Sauerkraut is full of probiotics (the good-for-your-gut stuff that’s also in yogurt!)–especially if you use non-pasteurized sauerkraut
  • It can feed a crowd, but it also makes amazing leftovers
  • The fake mashed potataoes do NOT taste like cream of wheat (#winning)

{Pssst…have you been reading this post and the entire time thinking that I am a crazy woman and that you would never in a million years eat sauerkraut? I swear this dish will convert you. The cooking time mellows the kraut so that you only get a hint of the pickled flavor and when eaten with the mash it’s almost like it just adds just a bit of sweet saltiness}

If you’re still nervous about this dish, my meat-and-potatoes Hungry Man himself asks for this dish on a weekly basis–it’s that good. I promise.

Overall, this dish has made me a believer that we can regularly enjoy meat & potatoes together…although I still will make the “real deal” (ie: mashed potatoes) when cooking for special occasions…or when it’s negative 30 degrees outside and you just need some stick-to-your-ribs potatoes to stay warm.

Why? Because life is about balance. And because potatoes are delicious.

…as is peanut butter…and speaking of, I think I may need to go find some for a quick snack…

Here’s to continuing to make culinary compromises—all in the name of love.

xoxo, alaina

his favorite food

spaghettiandmeatballs
my version of spaghetti and meatballs: seasoned spaghetti squash with sausage marinara sauce & roasted rosemary garlic green beans

Here’s the deal: Tom loves spaghetti and meatballs.

And when I say loves spaghetti and meatballs I’m not exaggerating. In college, the man frequently ate an entire box of spaghetti in one sitting.

{…that’s right…an entire box of spaghetti. aka one pound of pasta. aka over 1600 calories before sauce and meatballs. I still have no idea how he physically did this.}

Creating a meal that satisfied his craving for his favorite food while making it something that I actually felt good about eating (ie: less sugar, less processed, & more nutrient-dense) was a challenge. While the solution offered by diet magazines and talk shows everywhere seems to be just swapping spaghetti squash for pasta–there’s a problem. The challenge with this dish is not just the pasta–it’s what you put on it.

{WARNING: BRIEF SOAP BOX MOMENT AHEAD}

Next time you’re grocery shopping, do the following:

  1. Pick-up bottle of jarred spaghetti sauce
  2. Read nutrition label of back of jar
  3. Refrain from dropping jar in HORROR in the amount of sugar in it–usually at least 12 grams, or three teaspoons of sugar in 1/2 cup serving (and who only eats a half cup of sauce…I mean c’mon…sauce is like the best part)

Unless my name is Buddy the Elf, I wasn’t planning on eating that much sugar with my spaghetti.

buddytheelfspaghetti
buddy, I love you…but sugar isn’t one of my main food groups

{Phew…I digress. I promise.}

When you add on top of this our average meatballs made with fatty ground beef and bread crumbs–it just becomes a really rich meal really fast. Again, there is nothing wrong with eating some meatballs and pasta every once in a while–let’s get real, it’s absolutely delicious–but for most families (and as Tom would prefer) this is a weekly staple for dinner. Consuming this much sugar this frequently is a no-no for us and my family history of diabetes.

So…where’s the compromise?

Here’s our answer: 

  • Properly seasoned and cooked spaghetti squash (you can make it taste like spaghetti and have the same mouth-feel, I promise)
  • Homemade spicy red sauce
  • Flavorful chicken sausage
  • …and a side of rosemary garlic green beans…because while garlic bread may not make the cut for our dinner, garlic always does!

| Seasoned Spaghetti Squash with Sausage Marinara Sauce & Roasted Rosemary Garlic Green Beans |

Serves: 3 Tom’s or 4 Alaina’s

Ingredients Needed:

For the squash:

  • 1 large spaghetti squash (about football-sized)
  • 2 tbsp. olive oil
  • 1/2 tsp. salt
  • 1/2 tsp. pepper

For the sauce:

  • 2-3 cups tomatoes, diced (I recommend grape tomatoes, and use your food processor to dice…and, if you’re desperate, canned diced tomatoes work too!)
  • 1 medium to large onion, diced (ditto food processor tip above)
  • 3 tsp. olive oil
  • 2 tsp. minced garlic (or about four cloves, minced)
  • 1/2 tsp. oregano
  • 1 tsp. italian seasoning
  • 1/2 tsp. red pepper flakes
  • 4 pre-cooked chicken sausages, sliced (I recommend AmyLu’s Apple Gouda Chicken Sausages..get ’em at Costco and they will change your life)

 For the green beans:

  • 3 to 4 cups fresh green beans–washed, dried, &  trimmed
  • 2 tsp. olive oil
  • 1 tsp. dried rosemary
  • 1/4 tsp. garlic powder
  • 1/4 tsp. salt
  • 1/4 tsp. pepper

Directions:

  • Preheat oven to 400 degrees F
  • Prepare spaghetti squash
    • Sharpen your knife–these babies are HARD and you can easily cut yourself. Be careful! If you ever find you can’t cut a spaghetti squash, pierce the entire thing with a fork and microwave for 2-3 minutes to soften. Then try cutting again. Repeat until you can safely cut  the squash.
    • Cut ends off squash–about an inch on each side
    • Cut the squash down the middle length-wise
    • Using a spoon, scrape out the guts/seeds like you would with a pumpkin
    • Brush liberally with olive oil ( I use my fingers to really rub it in the flesh of the squash) and generously sprinkle with salt and pepper
  • Lay squash halves flat (cut-side down) on a rimmed cookie sheet
  • Using a fork, pierce the each squash piece a dozen or so times (to let excess steam escape)
  • Bake for 45 minutes

While the squash is cooking, make the sauce…

  • Heat olive oil in a large rimmed skillet/sauce pot (ensure you have a cover that fits it for later!)
  • Add garlic and onion and saute until fragrant (about three to four minutes)
  • Stir in tomatoes, seasonings, and sausage
  • Cover & let simmer until you serve–stirring occasionally
    • PS- This sauce gets better the longer it simmers–feel free to make it in advance (and even freeze it) & just reheat it for a quick weeknight dinner! 

Once the sauce is simmering, prepare your green beans…

  • Lay green beans on rimmed cookie sheet
  • Drizzle olive oil on beans and sprinkle with seasonings
  • Using your hands, combine the mixture so it is all well-coated and seasoned
  • Set aside

BEEP! BEEP! BEEP! 45 minutes have gone by and your squash is done…

  • Check if your squash is done
    • If you can easily piece the skin with a fork, it’s done; if not, put it back in the over for another 10 minutes
    • Repeat until the squash is easily pierced by a fork–this is CRUCIAL to ensure that the texture is truly like spaghetti and not too crunchy
  • When you’re sure your squash is done, set cookie sheet on a heat-safe surface

Let your squash slightly cool for a second, and grab those green beans…

  • Increase temperature of oven to 425 degrees F
  • Roast beans for 10 minutes

During those 10 minutes, return to your squash…

  • Using your forks from earlier, scrape the flesh of the squash and watch the “noodles” appear
  • As you work, transfer the “noodles” to your serving bowl

Scraping your squash should take about 10 minutes…

  • Once 10 minutes have passed, open oven door and use a spatula to stir beans to avoid any burn spots (be careful not to burn yourself!)
  • Close oven and increase oven temperature to 450 degrees
  • Continue roasting beans for 5 minutes, or until they are slightly wrinkled with some dark spots

Once your beans are done, everything’s ready to serve! 

  • I recommend topping with grated parmesan–or, even better, grated parmesan, romano, and asiago (we love Mama Francesca’s, below)
parm
with this stuff, more is more. it’s delish.

This recipe is truly one of our favorites–and does not sacrifice taste for health. The cheese and apple in the sausage gives the sauce a subtle sweet and savory flavor that is to-die-for, and the seasoned squash has a texture that is truly reminiscent of a big bowl of angel hair pasta. Paired with deliciously garlicky green beans–this dish is a standout.

Here’s to making many more culinary compromises–all in the name of love.

xoxo, alaina